emmm……这周最后一天了
0x00.前言 仍然是腾讯云开发者实验室(beta),今天换个实验做:
0x01.引用 1.0 TensorFlow 实现基于 CNN 数字识别的代码 1.1 前期准备 TensorFlow相关API可以到在实验TensorFlow - 相关 API中学习。
1.2 CNN模型构建 现在您可以在/home/ubuntu目录下创建源文件mnist_model.py,内容可参考:
1 2 3 4 5 6 7 8 9 10 11 12 13 14 15 16 17 18 19 20 21 22 23 24 25 26 27 28 29 30 31 32 33 34 35 36 37 38 39 40 41 42 43 44 45 46 47 48 49 50 51 52 53 54 55 56 57 58 59 60 61 62 63 64 65 66 67 68 69 70 71 72 73 74 75 76 77 78 79 80 81 from __future__ import absolute_importfrom __future__ import divisionfrom __future__ import print_functionimport argparseimport sysimport tempfilefrom tensorflow.examples.tutorials.mnist import input_dataimport tensorflow as tfFLAGS = None def deepnn (x ): with tf.name_scope('reshape' ): x_image = tf.reshape(x, [-1 , 28 , 28 , 1 ]) with tf.name_scope('conv1' ): W_conv1 = weight_variable([5 , 5 , 1 , 32 ]) b_conv1 = bias_variable([32 ]) h_conv1 = tf.nn.relu(conv2d(x_image, W_conv1) + b_conv1) with tf.name_scope('pool1' ): h_pool1 = max_pool_2x2(h_conv1) with tf.name_scope('conv2' ): W_conv2 = weight_variable([5 , 5 , 32 , 64 ]) b_conv2 = bias_variable([64 ]) h_conv2 = tf.nn.relu(conv2d(h_pool1, W_conv2) + b_conv2) with tf.name_scope('pool2' ): h_pool2 = max_pool_2x2(h_conv2) with tf.name_scope('fc1' ): W_fc1 = weight_variable([7 * 7 * 64 , 1024 ]) b_fc1 = bias_variable([1024 ]) h_pool2_flat = tf.reshape(h_pool2, [-1 , 7 *7 *64 ]) h_fc1 = tf.nn.relu(tf.matmul(h_pool2_flat, W_fc1) + b_fc1) with tf.name_scope('dropout' ): keep_prob = tf.placeholder(tf.float32) h_fc1_drop = tf.nn.dropout(h_fc1, keep_prob) with tf.name_scope('fc2' ): W_fc2 = weight_variable([1024 , 10 ]) b_fc2 = bias_variable([10 ]) y_conv = tf.matmul(h_fc1_drop, W_fc2) + b_fc2 return y_conv, keep_prob def conv2d (x, W ): return tf.nn.conv2d(x, W, strides=[1 , 1 , 1 , 1 ], padding='SAME' ) def max_pool_2x2 (x ): return tf.nn.max_pool(x, ksize=[1 , 2 , 2 , 1 ], strides=[1 , 2 , 2 , 1 ], padding='SAME' ) def weight_variable (shape ): initial = tf.truncated_normal(shape, stddev=0.1 ) return tf.Variable(initial) def bias_variable (shape ): initial = tf.constant(0.1 , shape=shape) return tf.Variable(initial)
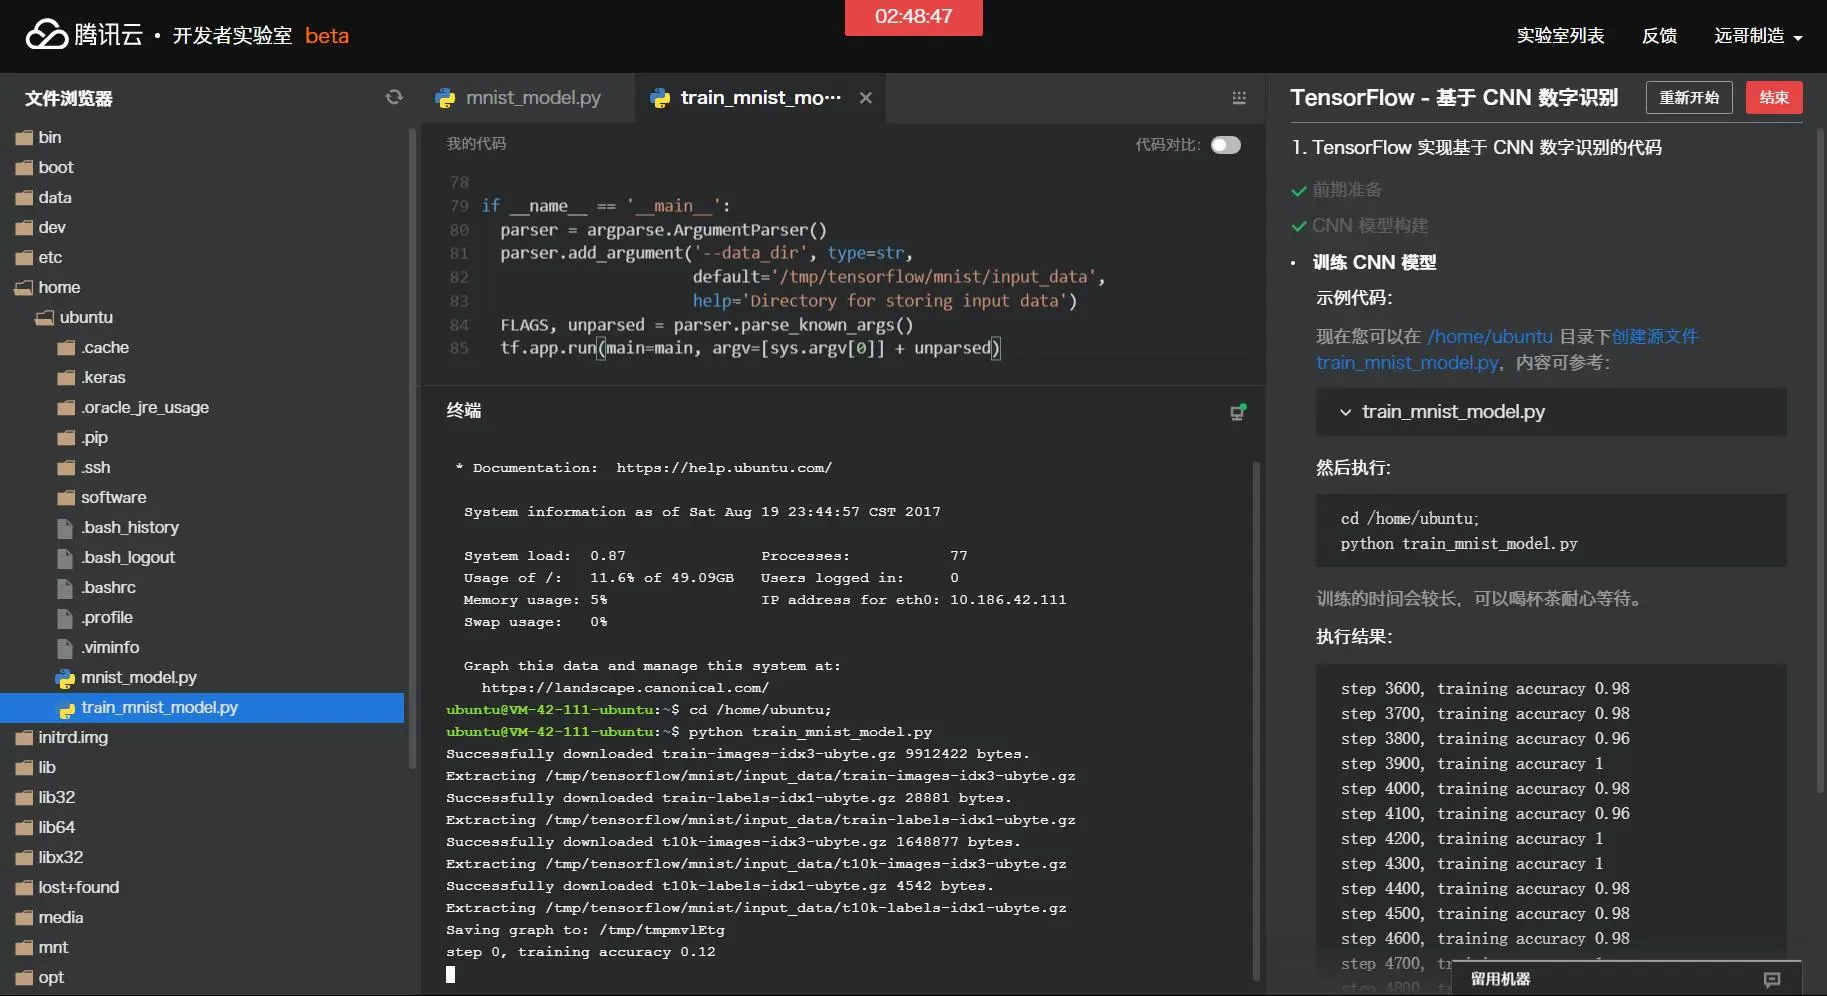
1.3 训练 CNN 模型 现在您可以在/home/ubuntu目录下创建源文件train_mnist_model.py,内容可参考:
1 2 3 4 5 6 7 8 9 10 11 12 13 14 15 16 17 18 19 20 21 22 23 24 25 26 27 28 29 30 31 32 33 34 35 36 37 38 39 40 41 42 43 44 45 46 47 48 49 50 51 52 53 54 55 56 57 58 59 60 61 62 63 64 65 66 67 68 69 70 71 72 73 74 75 76 77 78 79 80 81 82 83 84 85 from __future__ import absolute_importfrom __future__ import divisionfrom __future__ import print_functionimport argparseimport sysimport tempfilefrom tensorflow.examples.tutorials.mnist import input_dataimport tensorflow as tfimport mnist_modelFLAGS = None def main (_ ): mnist = input_data.read_data_sets(FLAGS.data_dir, one_hot=True ) x = tf.placeholder(tf.float32, [None , 784 ]) y_ = tf.placeholder(tf.float32, [None , 10 ]) y_conv, keep_prob = mnist_model.deepnn(x) with tf.name_scope('loss' ): cross_entropy = tf.nn.softmax_cross_entropy_with_logits(labels=y_, logits=y_conv) cross_entropy = tf.reduce_mean(cross_entropy) with tf.name_scope('adam_optimizer' ): train_step = tf.train.AdamOptimizer(1e-4 ).minimize(cross_entropy) with tf.name_scope('accuracy' ): correct_prediction = tf.equal(tf.argmax(y_conv, 1 ), tf.argmax(y_, 1 )) correct_prediction = tf.cast(correct_prediction, tf.float32) accuracy = tf.reduce_mean(correct_prediction) graph_location = tempfile.mkdtemp() print ('Saving graph to: %s' % graph_location) train_writer = tf.summary.FileWriter(graph_location) train_writer.add_graph(tf.get_default_graph()) saver = tf.train.Saver() with tf.Session() as sess: sess.run(tf.global_variables_initializer()) for i in range (5000 ): batch = mnist.train.next_batch(50 ) if i % 100 == 0 : train_accuracy = accuracy.eval (feed_dict={ x: batch[0 ], y_: batch[1 ], keep_prob: 1.0 }) print ('step %d, training accuracy %g' % (i, train_accuracy)) train_step.run(feed_dict={x: batch[0 ], y_: batch[1 ], keep_prob: 0.5 }) test_accuracy = 0 for i in range (200 ): batch = mnist.test.next_batch(50 ) test_accuracy += accuracy.eval (feed_dict={x: batch[0 ], y_: batch[1 ], keep_prob: 1.0 }) / 200 ; print ('test accuracy %g' % test_accuracy) save_path = saver.save(sess,"mnist_cnn_model.ckpt" ) if __name__ == '__main__' : parser = argparse.ArgumentParser() parser.add_argument('--data_dir' , type =str , default='/tmp/tensorflow/mnist/input_data' , help ='Directory for storing input data' ) FLAGS, unparsed = parser.parse_known_args() tf.app.run(main=main, argv=[sys.argv[0 ]] + unparsed)
然后执行:cd /home/ubuntupython train_mnist_model.py;,原文给的……
1
2
3
4
5
6
7
8
9
10
11
12
13
14
15
step 3600, training accuracy 0.98 step 3700, training accuracy 0.98 step 3800, training accuracy 0.96 step 3900, training accuracy 1 step 4000, training accuracy 0.98 step 4100, training accuracy 0.96 step 4200, training accuracy 1 step 4300, training accuracy 1 step 4400, training accuracy 0.98 step 4500, training accuracy 0.98 step 4600, training accuracy 0.98 step 4700, training accuracy 1 step 4800, training accuracy 0.98 step 4900, training accuracy 1 test accuracy 0.9862
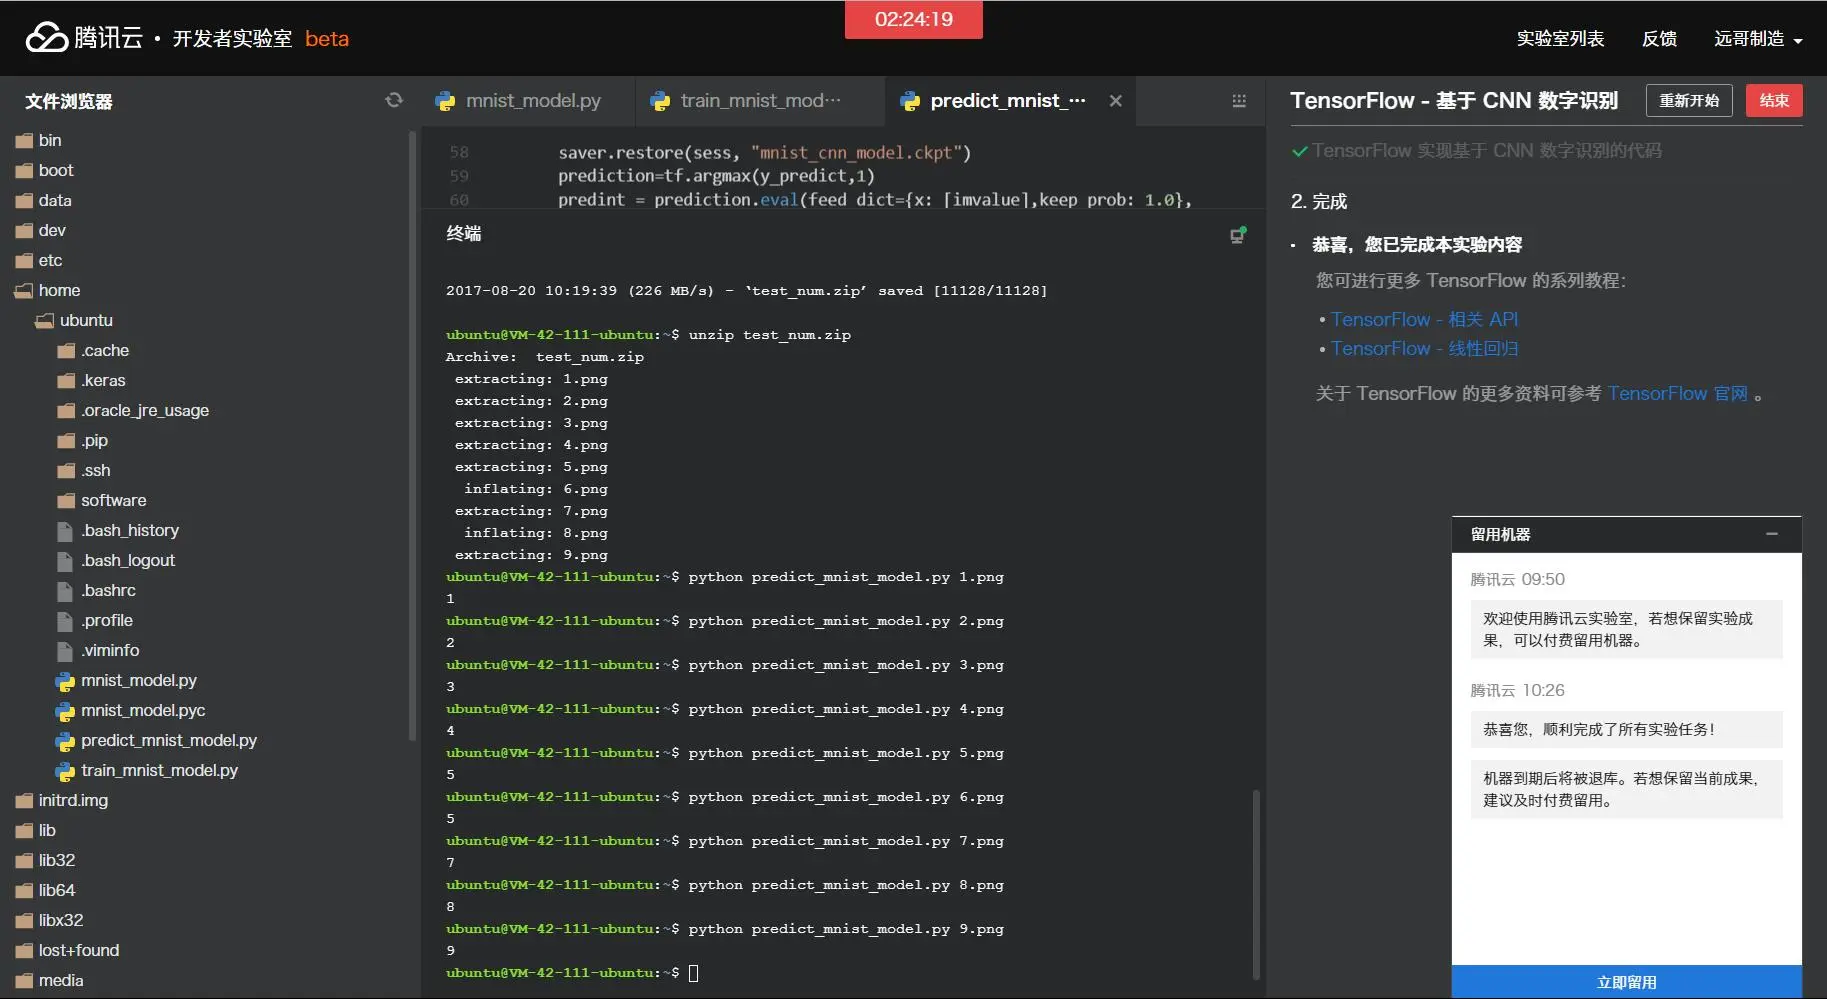
1.4 测试 CNN 模型 下载测试图片test_num.zipcd /home/ubuntuwget http://tensorflow-1253902462.cosgz.myqcloud.com/test_num.ziptest_num.zip,其中1-9.png!webp为1-9数字图片。unzip test_num.zippredict代码/home/ubuntu目录下创建源文件predict_mnist_model.py,内容可参考:
1 2 3 4 5 6 7 8 9 10 11 12 13 14 15 16 17 18 19 20 21 22 23 24 25 26 27 28 29 30 31 32 33 34 35 36 37 38 39 40 41 42 43 44 45 46 47 48 49 50 51 52 53 54 55 56 57 58 59 60 61 62 63 64 from __future__ import absolute_importfrom __future__ import divisionfrom __future__ import print_functionimport argparseimport sysimport tempfilefrom tensorflow.examples.tutorials.mnist import input_dataimport tensorflow as tfimport mnist_modelfrom PIL import Image, ImageFilterdef load_data (argv ): grayimage = Image.open (argv).convert('L' ) width = float (grayimage.size[0 ]) height = float (grayimage.size[1 ]) newImage = Image.new('L' , (28 , 28 ), (255 )) if width > height: nheight = int (round ((20.0 /width*height),0 )) if (nheigth == 0 ): nheigth = 1 img = grayimage.resize((20 ,nheight), Image.ANTIALIAS).filter (ImageFilter.SHARPEN) wtop = int (round (((28 - nheight)/2 ),0 )) newImage.paste(img, (4 , wtop)) else : nwidth = int (round ((20.0 /height*width),0 )) if (nwidth == 0 ): nwidth = 1 img = grayimage.resize((nwidth,20 ), Image.ANTIALIAS).filter (ImageFilter.SHARPEN) wleft = int (round (((28 - nwidth)/2 ),0 )) newImage.paste(img, (wleft, 4 )) tv = list (newImage.getdata()) tva = [ (255 -x)*1.0 /255.0 for x in tv] return tva def main (argv ): imvalue = load_data(argv) x = tf.placeholder(tf.float32, [None , 784 ]) y_ = tf.placeholder(tf.float32, [None , 10 ]) y_conv, keep_prob = mnist_model.deepnn(x) y_predict = tf.nn.softmax(y_conv) init_op = tf.global_variables_initializer() saver = tf.train.Saver() with tf.Session() as sess: sess.run(init_op) saver.restore(sess, "mnist_cnn_model.ckpt" ) prediction=tf.argmax(y_predict,1 ) predint = prediction.eval (feed_dict={x: [imvalue],keep_prob: 1.0 }, session=sess) print (predint[0 ]) if __name__ == "__main__" : main(sys.argv[1 ])
然后执行:cd /home/ubuntupython predict_mnist_model.py 1.png!webp1
你可以修改1.png!webp为1-9.png!webp中任意一个
emmm……我要看下原图
0x02.后记
文件浏览器的刷新按钮好像坏掉了,实验做到最后文件也没改变……手动点下上层文件夹就好了