昨天晚上和今天上午研究的成果
0x00.前言
曾经大二有段时间,自己电脑安了四系统——Win 10、Ubuntu 16.04、Mac OS X、PhoenixOS……但是那时候因为还没买现在用的2T硬盘,所以空间不够最终删了Ubuntu 16.04分区,剩余三系统一直用到了现在。然而,虽然现在上了2T硬盘但是空间又被我用满了,所以就不折腾分区了(现在的整数分区已经够完美了),直接在VMware Workstation里搞得了……
0x01.安装 Ubuntu 17.04 虚拟机
下载ISO镜像,VM中稍后选择重装系统,配置,光驱指向下载的ISO,开机,按照提示安装完成即可。
配置:CPU:4*2,RAM:4GB,SCSI:20GB,NAT。
系统内的分配就不说了(原因是我忘了……)
0x02.环境配置
1.安装Python 27
sudo apt-get install python-pip python-dev python-virtualenv
2.更改pip默认源
默认源服务器在国外,国内下载较慢,有必要换为国内阿里源。
对于
Ubuntu来说,在主目录的.pip文件夹中创建如下内容的pip.conf即可:
1 | [global] |
3.升级pip
1 | pip install --upgrade pip |
TensorFlow有两个版本:CPU版本和GPU版本。
虚拟机里想什么GPU呢,滑稽
4.创建虚拟环境目录
sudo mkdir ~/env
5.利用VirtualEnv命令创建位于~/env/tensorflow的虚拟环境
virtualenv --system-site-packages ~/env/tensorflow
6.激活方法(此时变为(tensorflow)$)
source ~/env/tensorflow/bin/activate
7.创建一个激活该虚拟环境的快捷命令
sudo printf '\nalias tensorflow="source ~/env/tensorflow/bin/activate"' >> ~/.bashrc
注:重启终端生效
8.关闭方法
deactivate
0x03.pip安装TensorFlow-CPU
pip install --upgrade tensorflow
或者:pip install --upgrade <$url_to_binary.whl>
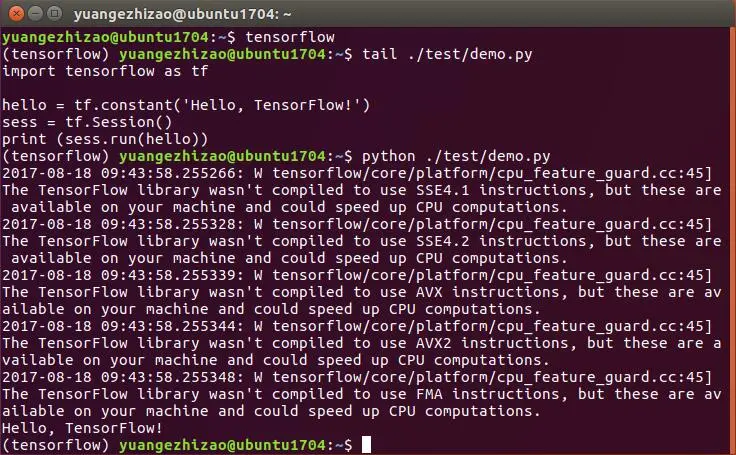
0x04.测试

这个提示,强迫症患者要受不了了……
这也是为什么本文的标题是编译
0x05.再一次的环境配置
1.Install Bazel
采用官方给出两种方法的第一种,也是推荐的那种
Using Bazel custom APT repository (recommended)
- Install JDK 8
Install JDK 8 by using:sudo apt-get install openjdk-8-jdk
On Ubuntu 14.04 LTS you’ll have to use a PPA:sudo add-apt-repository ppa:webupd8team/javasudo apt-get update && sudo apt-get install oracle-java8-installer - Add Bazel distribution URI as a package source (one time setup)
echo "deb [arch=amd64] http://storage.googleapis.com/bazel-apt stable jdk1.8" | sudo tee /etc/apt/sources.list.d/bazel.listcurl https://bazel.build/bazel-release.pub.gpg | sudo apt-key add -
If you want to install the testing version of Bazel, replace stable with testing. - Install and update Bazel
sudo apt-get update && sudo apt-get install bazel
Once installed, you can upgrade to a newer version of Bazel with:sudo apt-get upgrade bazel
2.Install TensorFlow Python dependencies
sudo apt-get install python-numpy python-dev python-pip python-wheel
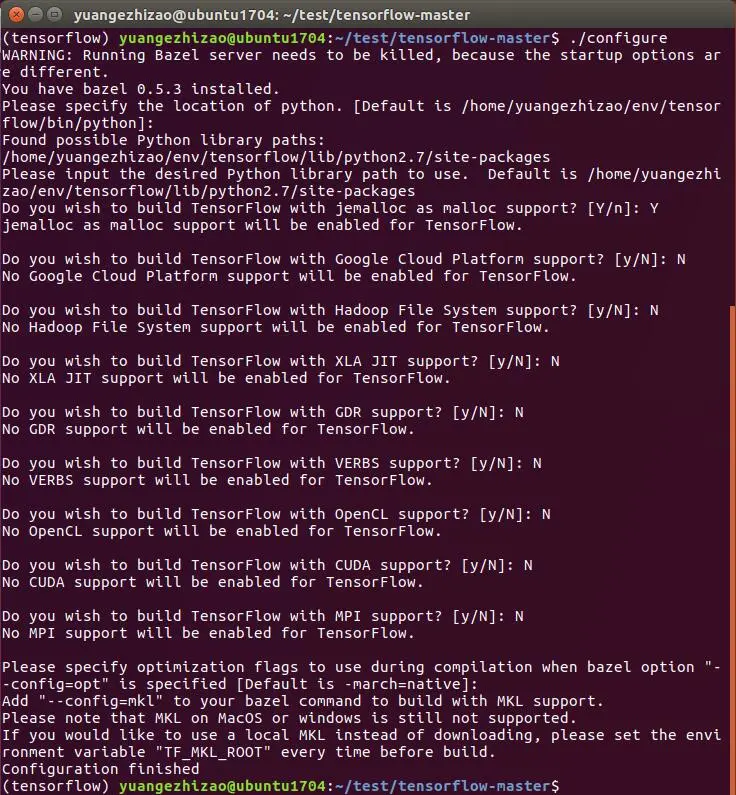
3.Configure the installation
./configure
这里给出我的选择:

强迫症的我,也尽量选N(因为多不一定好)……
0x06.编译安装
bazel build --config=opt //tensorflow/tools/pip_package:build_pip_packagebazel-bin/tensorflow/tools/pip_package/build_pip_package /tmp/tensorflow_pkgsudo pip install /tmp/tensorflow_pkg/< 自行替换 >.whl(.whl文件的实际名字与使用的平台有关)
0x07.后记
编译报错:gcc: internal compiler error: Killed (program cc1plus)
查找原因,swap分区满了……不折腾了……
0x08.引用
https://www.tensorflow.org/install/install_sources#ConfigureInstallation
TensorFlow安装–(方法1)系统自带Python,VirtualEnv方式安装(Ubuntu14.04 64位CPU)
Ubuntu14.04源码编译安装CPU版本的tensorflow
下载与安装