终于这个假期换到了 Linux 平台,今天(2018-2-23 16:23:22)再次重装

0x00.重装

换系统,换到 Linux 平台,选 Ubuntu 吧,并且拒绝所谓的安全防护。
贴一下配置
贴一下配置

0x01.修改主机名

首先 ssh 密钥连接,然后先改这俩
首先 ssh 密钥连接,然后先改这俩

其一,临时生效修改
hostname <自定义内容>
重登shell生效
其二,永久生效修改(采用)
修改文件/etc/hostname, 将其对应的主机名修改为新的主机名
vim /etc/hostname
最后,需要将/etc/hosts127.0.0.1对应的老主机名更换为新的主机名
vim /etc/hosts
但是并没有找到老主机名,手动添加,如下(+那行)……

1
2
3
4
5
6
127.0.0.1       localhost
+ 127.0.0.1 Ubuntu
# The following lines are desirable for IPv6 capable hosts
::1 localhost ip6-localhost ip6-loopback
ff02::1 ip6-allnodes
ff02::2 ip6-allrouters

重登shell并没有生效,于是重启,生效了……

0x02.干掉Welcome to Alibaba Cloud Elastic Compute Service !

vim /etc/motd
去掉倒数第二行即可(为了美观,我只保留了一个空行)

0x03.更新一波

自带的源就是阿里云的,速度很快不需要修改

1
2
apt-get update
apt-get upgrade
上次选了默认,今天选了第一个
上次选了默认,今天选了第一个

0x04.安装图形化桌面

1
2
3
apt-get install x-window-system-core
apt-get install gnome-core
apt-get install gdm

运行startx启动图形化桌面(当然XShell 里不能这么干

1
2
3
4
5
6
7
8
9
10
11
12
13
14
15
16
17
18
19
20
21
22
23
24
25
26
27
28
29
30
root@Ubuntu:~# startx
hostname: Name or service not known
xauth: file /root/.Xauthority does not exist
xauth: (stdin):1: bad display name "Ubuntu:0" in "add" command


X.Org X Server 1.18.4
Release Date: 2016-07-19
X Protocol Version 11, Revision 0
Build Operating System: Linux 4.4.0-97-generic x86_64 Ubuntu
Current Operating System: Linux Ubuntu 4.4.0-105-generic #128-Ubuntu SMP Thu Dec 14 12:42:11 UTC 2017 x86_64
Kernel command line: BOOT_IMAGE=/boot/vmlinuz-4.4.0-105-generic root=UUID=e2048966-750b-4795-a9a2-7b477d6681bf ro net.ifnames=0 quiet console=tty0 console=ttyS0,115200n8
Build Date: 13 October 2017 01:57:05PM
xorg-server 2:1.18.4-0ubuntu0.7 (For technical support please see http://www.ubuntu.com/support)
Current version of pixman: 0.33.6
Before reporting problems, check http://wiki.x.org
to make sure that you have the latest version.
Markers: (--) probed, (**) from config file, (==) default setting,
(++) from command line, (!!) notice, (II) informational,
(WW) warning, (EE) error, (NI) not implemented, (??) unknown.
(==) Log file: "/var/log/Xorg.0.log", Time: Fri Feb 23 17:00:08 2018
(==) Using system config directory "/usr/share/X11/xorg.conf.d"


^Cxinit: connection to X server lost

waiting for X server to shut down (II) Server terminated successfully (0). Closing log file.

xinit: unexpected signal 2
xauth: (argv):1: bad display name "Ubuntu:0" in "remove" command

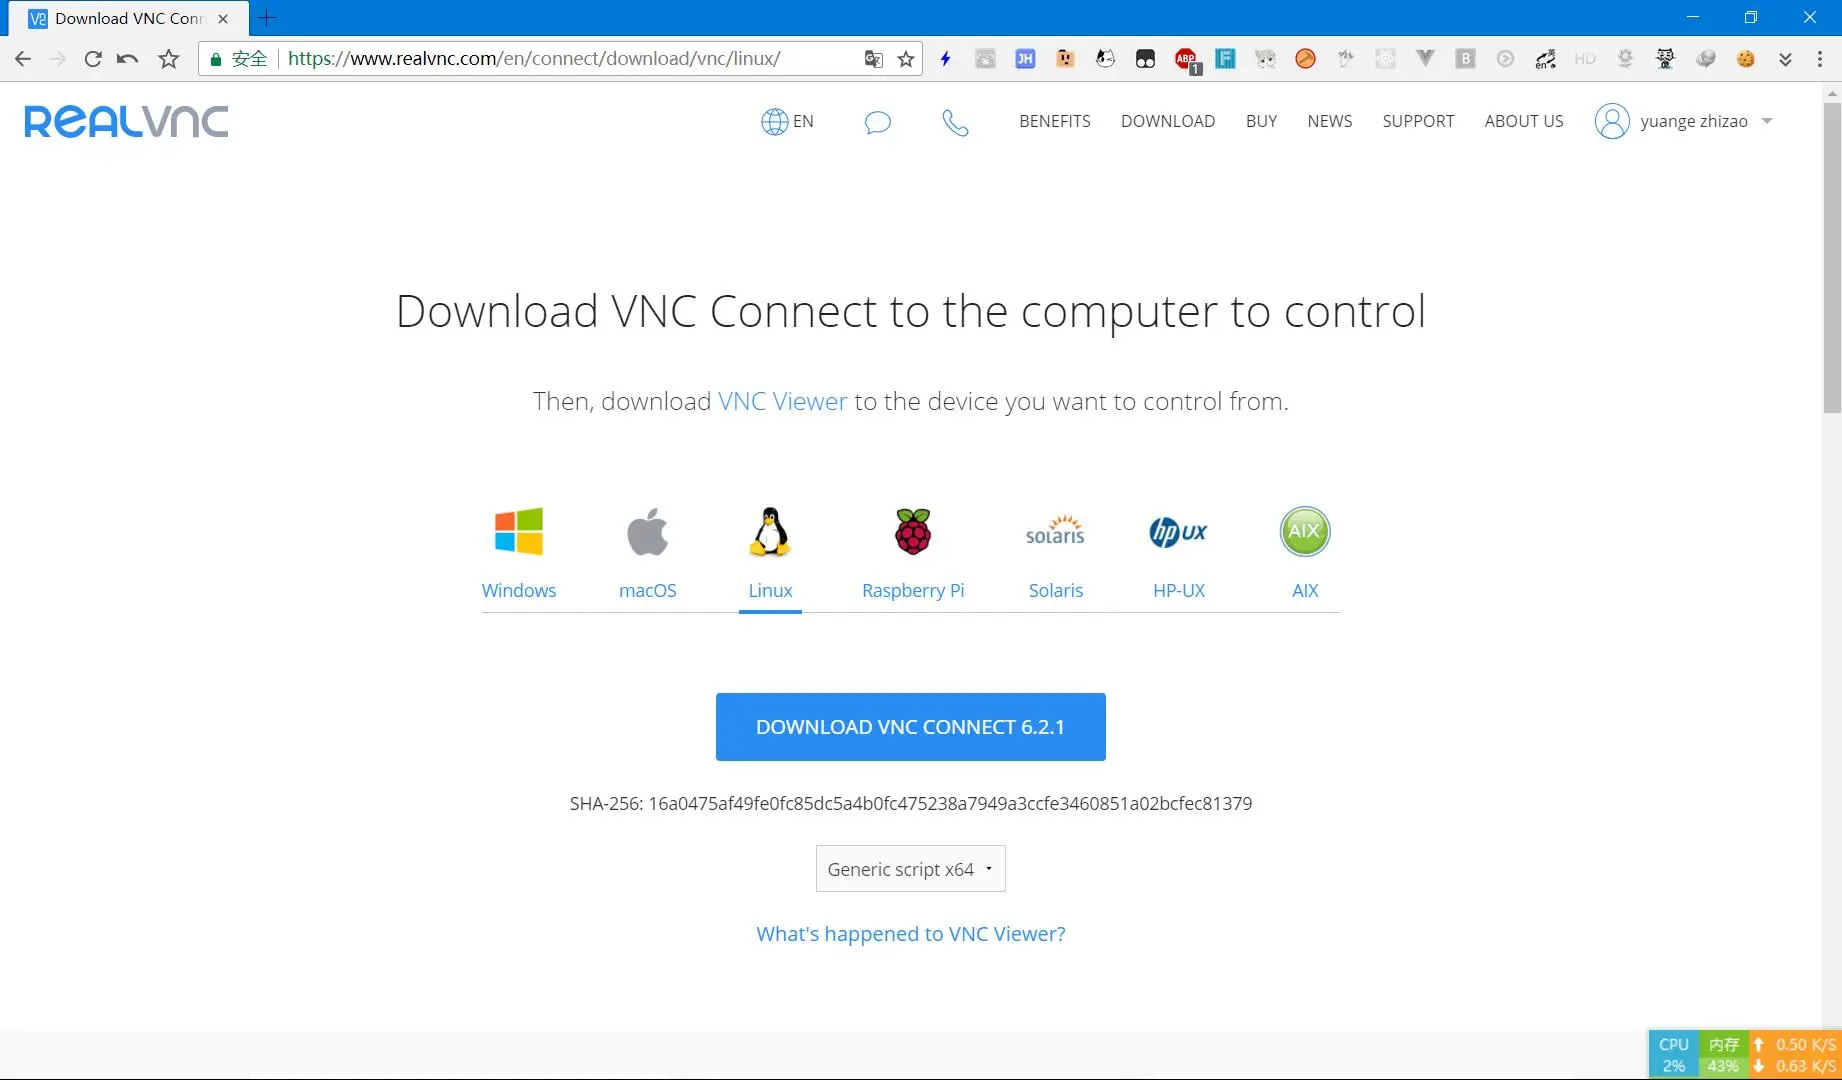
0x05.安装 realvnc 的 VNC Server

下载VNC-Server-6.2.1-Linux-x64-ANY.tar.gz
1
2
3
4
5
cd Downloads/
wget https://www.realvnc.com/download/file/vnc.files/VNC-Server-6.2.1-Linux-x64-ANY.tar.gz
tar zxvf VNC-Server-6.2.1-Linux-x64-ANY.tar.gz
cd VNC-Server-6.2.1-Linux-x64/
./vncinstall
1
2
systemctl enable vncserver-x11-serviced.service
systemctl start vncserver-x11-serviced.service

上次没有realvnc很快配好,这次发现没有设置密码的地方,于是翻文档
还有这个文档
可知Home版订阅必须在图形化界面下操作,不能在命令行下

因为禁用了账户登录,只能使用密钥
因为禁用了账户登录,只能使用密钥

但是可以在远程终端使用账户登录,于是先分配密码(勿仿)
passwd root
然后去远程终端startx,然后发现居然有浏览器……
但是并没有找到realvnc的应用程序,又看到这篇Thread: How to install REALVNC gui in ubuntu 12.04?
又看到

1
2
3
4
5
6
7
############# Specify a VNC password for VNC Server #############
# Mandatory for Home subscription (except Raspberry Pi). Not required for Professional or Enterprise subscription. More information:
# man vncpasswd
# Specify a VNC password for VNC Server in Service Mode:
sudo vncpasswd -service
# Enterprise subscription only. Specify a VNC password for VNC Server in Virtual Mode:
vncpasswd -virtual

只能是前8位,但还是连不上,The connection was refused by the computer

1
2
3
4
5
6
7
root@Ubuntu:~/Downloads# vncpasswd -service
Setting "Password" VNC parameter for Service Mode server
Password:
Verify:
Successfully set "Password" VNC parameter in /root/.vnc/config.d/vncserver-x11
Please note users of third party VNC Viewer projects will be able to connect by
entering the first 8 characters of this password only.

0x06.安装 vnc4server

apt-get install vnc4server
启动 vncserver 会生成.vnc/xstarup 文件

1
2
3
4
5
6
7
8
9
10
11
12
13
14
root@Ubuntu:~/Downloads# vncserver :1

You will require a password to access your desktops.

Password:
Verify:
Password too long - only the first 8 characters will be used
xauth: (stdin):1: bad display name "Ubuntu:1" in "add" command

New 'Ubuntu:1 (root)' desktop is Ubuntu:1

Creating default startup script /root/.vnc/xstartup
Starting applications specified in /root/.vnc/xstartup
Log file is /root/.vnc/Ubuntu:1.log

关闭vncservervncserver -kill :1
安装gnome 2桌面:apt-get install --no-install-recommends ubuntu-desktop gnome-panel gnome-settings-daemon metacity nautilus gnome-terminal -y
vim ~/.vnc/xstartup
添加

1
2
3
4
gnome-panel & 
gnome-settings-daemon &
metacity &
nautilus &
默认
默认

终于可以连上了,但是没桌面是啥情况……

0x07.配置history命令显示操作时间、用户和登录IP

/etc/profile文件中添加

1
2
3
4
5
6
7
8
9
HISTFILESIZE=4000  #默认保存命令是1000条,这里修改为4000条
HISTSIZE=4000
USER_IP=`who -u am i 2>/dev/null| awk '{print $NF}'|sed -e 's/[()]//g'` #取得登录客户端的IP
if [ -z $USER_IP ]
then
USER_IP=`hostname`
fi
HISTTIMEFORMAT="%F %T $USER_IP:`whoami` " #设置新的显示history的格式
export HISTTIMEFORMAT

保存完之后,执行source /etc/profile使配置生效。

0x08.安装 & 配置MySQL

apt-get install mysql-server

设置密码
设置密码
再次确认
再次确认

测试是否安装成功:
netstat -tap | grep mysql
设置外网访问:
vim /etc/mysql/mysql.conf.d/mysqld.cnf
注释# bind-address = 127.0.0.1
进入MySQL

1
2
3
4
mysql -uroot -p密码
grant all on *.* to root@'%' identified by '密码' with grant option;
flush privileges;
quit

重启MySQL
service mysql restart

连接成功
连接成功

修改字符集

1
2
[mysqld]
character_set_server=utf8

0x09.安装Redis

sudo apt install redis-server
设置密码以及外网访问
sudo vim /etc/redis/redis.conf
# requirepass foobared去掉#号注释,把foobared替换为密码。
#bind 127.0.0.1注释
databases 5
重启服务:sudo systemctl restart redis

0x10.安装Docker

卸载旧版本
sudo apt-get remove docker docker-engine docker.io
更新apt
sudo apt-get update
安装https支持包

1
2
3
4
5
sudo apt-get install \
apt-transport-https \
ca-certificates \
curl \
software-properties-common

添加Docker官方GPG密钥
curl -fsSL https://download.docker.com/linux/ubuntu/gpg | sudo apt-key add -

1
2
3
4
5
6
$ sudo apt-key fingerprint 0EBFCD88

pub 4096R/0EBFCD88 2017-02-22
Key fingerprint = 9DC8 5822 9FC7 DD38 854A E2D8 8D81 803C 0EBF CD88
uid Docker Release (CE deb) <docker@docker.com>
sub 4096R/F273FCD8 2017-02-22

添加稳定版的仓库源(amd64)

1
2
3
4
sudo add-apt-repository \
"deb [arch=amd64] https://download.docker.com/linux/ubuntu \
$(lsb_release -cs) \
stable"

安装DOCKER CE
sudo apt-get update
sudo apt-get install docker-ce
sudo systemctl enable docker
sudo systemctl start docker
配置加速器
curl -sSL https://get.daocloud.io/daotools/set_mirror.sh | sh -s http://e6d6fb48.m.daocloud.io
测试,需要sudo
sudo docker run hello-world
建立docker用户组
sudo groupadd docker
sudo usermod -aG docker $(whoami)
重新登录,这样无需sudo
docker run hello-world

引用

阿里云 ECS 监控卸载,屏蔽云盾 IP
ubuntu16.04 开启 ssh 和 vncserver