寒假剁手买了板子,每天都在折腾中……

0x00.前言

成文时间仓促也不想细写,所以不适合无基础人士阅读!(请善用Gitment评论区

0x01.Etcher烧录镜像

2020-02-13之后的2020-05-27版本重命名为Raspberry Pi OS (previously called Raspbian),并且明显标注出Raspberry Pi OS (32-bit) with desktop and recommended software暗示64位系统会release的,更新日志

Raspbian Buster with desktop and recommended software,2021-03-04-raspios-buster-armhf-full.img

2020-5-16 17:29:38
新卡的写入速度翻番了草

烧录
烧录
验证
验证
完成
完成

结果在完成时弹出失败了,印象里之前用这工具也遇到过这种情况

DG
DG
点击此处 ← 查看折叠
旧卡
旧卡
旧卡
旧卡

升级系统虽然sudo apt updatesudo apt dist-upgrade这两步就能解决,但是如果以前没安装某软件,就不能在更新中下载到它。所以还是重新烧录了最新版本的镜像。烧录完成创建一个空的ssh文件放在/boot分区下以开启ssh服务(有显示器也有网线)。所以,要记得插根网线
默认地址:raspberrypi.local
默认用户名:pi
默认密码:raspberry
之后修改密码,这里奇怪的是raspberrypi.local解析到的是ipv4地址而不是ipv6地址?

SSH
SSH

0x02.善于使用raspi-config

sudo raspi-config

你并不会看到这个图形化界面
你并不会看到这个图形化界面

不全说了,只挑几个。修改地区,修改主机名为rpi-slave,这样就能通过rpi-slave.local访问,5里的VNC就是RealVNC的,打开之后才能用VNC图形化连接,进去先连个WiFi,毕竟不是什么时候都有网线支持的,7A3 Memory Split调到64256A7 GL Griver我选的第二项G2 GL(Fake KMS),第一项VNC分辨率一直保持默认的小窗口,更改不生效,窗口文字渲染部分会加重,感觉是个Bug第一项Legacy

VNC
VNC
使用英文
使用英文
板载无线网卡已炸
板载无线网卡已炸
360 随身 WiFi 二代
360 随身 WiFi 二代

但是wlan0的存在会导致wlan1无法正常使用,重启即可需要进行手动屏蔽

有线和无线
有线和无线
在这里也可以进
在这里也可以进
新壁纸
新壁纸

0x03.apt使用自建代理访问

2022-04-03 15:43:19:参照官方文档:https://www.raspberrypi.com/documentation/computers/configuration.html#using-a-proxy-server
可以修改/etc/environment

1
2
3
export http_proxy="http://cn-py-dl-w9d:1081"
export https_proxy="http://cn-py-dl-w9d:1081"
export no_proxy="localhost, 127.0.0.1"

针对sudo运行的命令,还需要更新sudoers,之前没配置怪不得奇怪sudo怎么不走代理草

1
2
sudo visudo
Defaults env_keep+="http_proxy https_proxy no_proxy"

最后重启生效

sudo apt -o Acquire::http::proxy="http://cn-py-dl-w9d:1081/" update
sudo apt -o Acquire::http::proxy="http://cn-py-dl-w9d:1081/" upgrade -y
sudo apt -o Acquire::http::proxy="http://cn-py-dl-w9d:1081/" dist-upgrade

点击此处 ← 查看折叠

2019-6-24 20:16:38清华大学开源软件镜像站并没有buster版本的,所以选择了科大源
Raspbian 源使用帮助
Raspberrypi 源使用帮助
sudo sed -i 's|raspbian.raspberrypi.org|mirrors.ustc.edu.cn/raspbian|g' /etc/apt/sources.list
sudo sed -i 's|//archive.raspberrypi.org|//mirrors.ustc.edu.cn/archive.raspberrypi.org|g' /etc/apt/sources.list.d/raspi.list
更新软件索引清单:sudo apt update
比较索引清单更新依赖关系:sudo apt upgrade -y
全量更新:sudo apt full-upgrade -y

0x04.pip使用自建代理访问

举例:pip3 install --proxy="http://cn-py-dl-w9d:1081/" -U requests

点击此处 ← 查看折叠

更换清华pip镜像源

1.安装

curl https://bootstrap.pypa.io/get-pip.py -o get-pip.py
sudo python3 get-pip.py --force-reinstall

2.临时使用

1
pip install -i https://pypi.tuna.tsinghua.edu.cn/simple some-package

注意,simple不能少, 是https而不是http

3.设为默认

升级pip到最新的版本(>=10.0.0)后进行配置:

1
2
pip install -i https://pypi.tuna.tsinghua.edu.cn/simple pip -U
pip config set global.index-url https://pypi.tuna.tsinghua.edu.cn/simple

pip.conf文件配置示例如下:

1
2
[global]
index-url = https://pypi.tuna.tsinghua.edu.cn/simple

4.验证

1
2
3
4
5
6
7
8
9
10
11
12
13
14
15
16
17
18
19
20
21
22
23
24
25
26
27
28
29
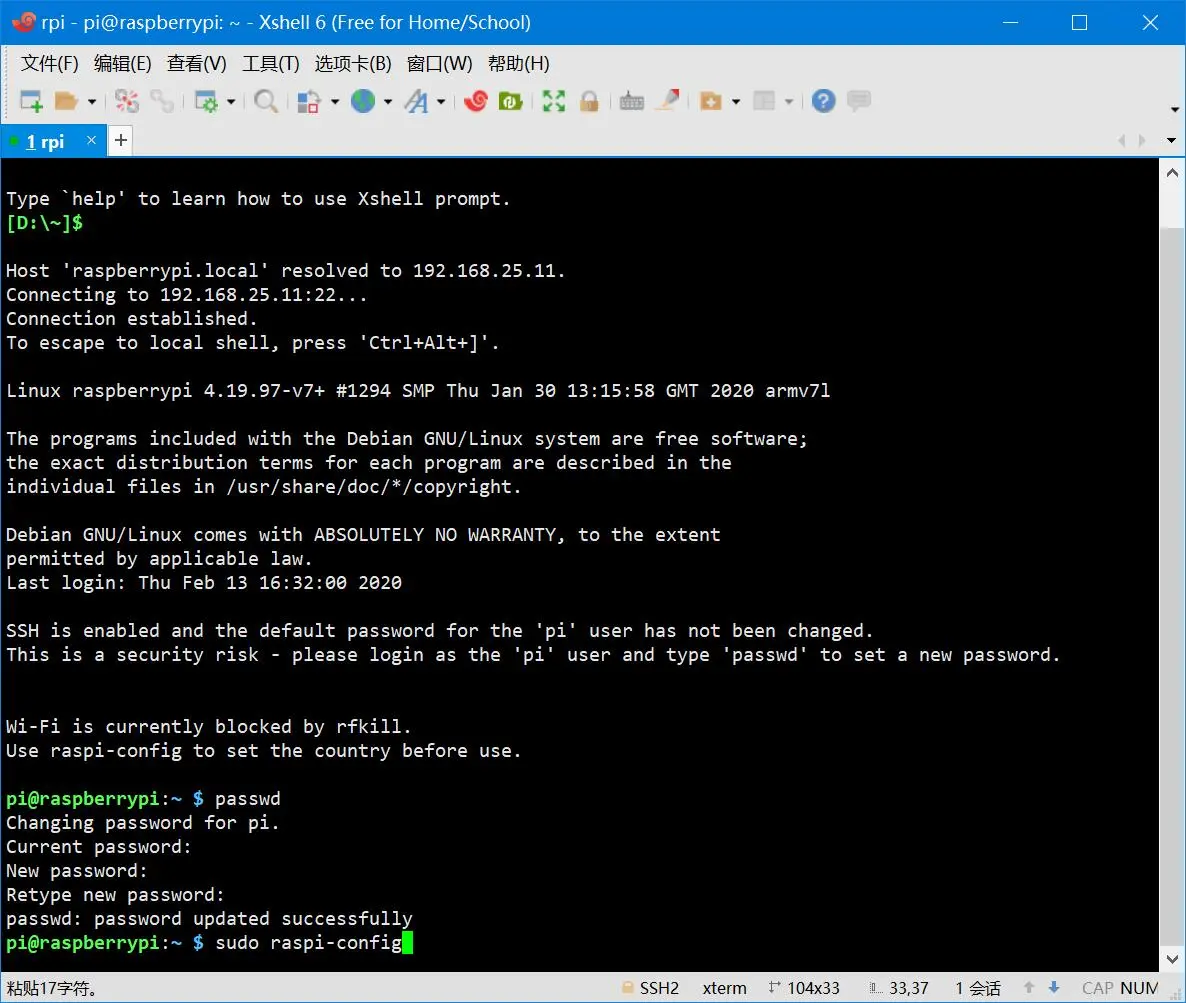
pi@rpi:~ $ pip show pip
WARNING: pip is being invoked by an old script wrapper. This will fail in a future version of pip.
Please see https://github.com/pypa/pip/issues/5599 for advice on fixing the underlying issue.
To avoid this problem you can invoke Python with '-m pip' instead of running pip directly.
DEPRECATION: Python 2.7 reached the end of its life on January 1st, 2020. Please upgrade your Python as Python 2.7 is no longer maintained. pip 21.0 will drop support for Python 2.7 in January 2021. More details about Python 2 support in pip, can be found at https://pip.pypa.io/en/latest/development/release-process/#python-2-support
Name: pip
Version: 20.1
Summary: The PyPA recommended tool for installing Python packages.
Home-page: https://pip.pypa.io/
Author: The pip developers
Author-email: pypa-dev@groups.google.com
License: MIT
Location: /home/pi/.local/lib/python2.7/site-packages
Requires:
Required-by:
pi@rpi:~ $ pip3 show pip
WARNING: pip is being invoked by an old script wrapper. This will fail in a future version of pip.
Please see https://github.com/pypa/pip/issues/5599 for advice on fixing the underlying issue.
To avoid this problem you can invoke Python with '-m pip' instead of running pip directly.
Name: pip
Version: 20.1
Summary: The PyPA recommended tool for installing Python packages.
Home-page: https://pip.pypa.io/
Author: The pip developers
Author-email: pypa-dev@groups.google.com
License: MIT
Location: /home/pi/.local/lib/python3.7/site-packages
Requires:
Required-by:

0x05.安装常用软件

sudo apt install vim axel iftop iotop -y

0x06.存储卡测速

关于config.txt的官网说明:https://www.raspberrypi.org/documentation/configuration/config-txt/README.md
奇怪的是并没有在overclocking中找到sd_overclock,全部配置项也就只有这些:

  • Memory
  • Licence Keys/Codecs
  • Video/Display
  • Audio
  • Camera
  • Boot
  • Ports and Device Tree
  • GPIOs
  • Overclocking
  • Conditional Filters
  • Miscellaneous
1
2
3
4
5
6
7
8
9
10
11
12
13
14
15
16
17
18
19
20
21
22
23
24
25
26
27
28
29
30
31
32
33
34
pi@rpi-slave:~/Downloads $ sudo apt install hdparm -y
pi@rpi-slave:~/Downloads $ curl -fsSL http://www.nmacleod.com/public/sdbench.sh -o sdbench.sh
pi@rpi-slave:~/Downloads $ chmod +x sdbench.sh
pi@rpi-slave:~/Downloads $ sudo ./sdbench.sh
CONFIG:
CLOCK : 50.000 MHz
CORE : 400 MHz, turbo=0
DATA : 512 MB, /root/test.dat

HDPARM:
======
HDIO_DRIVE_CMD(identify) failed: Invalid argument
Timing O_DIRECT disk reads: 64 MB in 3.08 seconds = 20.80 MB/sec
HDIO_DRIVE_CMD(identify) failed: Invalid argument
Timing O_DIRECT disk reads: 64 MB in 3.05 seconds = 20.97 MB/sec
HDIO_DRIVE_CMD(identify) failed: Invalid argument
Timing O_DIRECT disk reads: 64 MB in 3.05 seconds = 20.99 MB/sec

WRITE:
=====
536870912 bytes (537 MB, 512 MiB) copied, 35.2385 s, 15.2 MB/s
536870912 bytes (537 MB, 512 MiB) copied, 33.5212 s, 16.0 MB/s
536870912 bytes (537 MB, 512 MiB) copied, 38.3053 s, 14.0 MB/s

READ:
====
536870912 bytes (537 MB, 512 MiB) copied, 24.7405 s, 21.7 MB/s
536870912 bytes (537 MB, 512 MiB) copied, 24.7725 s, 21.7 MB/s
536870912 bytes (537 MB, 512 MiB) copied, 24.8219 s, 21.6 MB/s

RESULT (AVG):
============
Overlay config core_freq turbo overclock_50 WRITE READ HDPARM
400 0 50.000 MHz inf MB/s inf MB/s 20.91 MB/s

0x07.开启64位内核

修改/boot/config.txt后重启:arm_64bit=1

0x08.修改交换分区大小

因为默认100M编译FFmpeg会不够用,分他个500M应该够了,当然2G是最好的了……修改CONF_SWAPSIZE即可

1
2
3
4
5
6
7
pi@rpi-slave:~ $ sudo vim /etc/dphys-swapfile
pi@rpi-slave:~ $ sudo /etc/init.d/dphys-swapfile restart
[ ok ] Restarting dphys-swapfile (via systemctl): dphys-swapfile.service.
pi@rpi-slave:~ $ free -h
total used free shared buff/cache available
Mem: 924Mi 169Mi 349Mi 14Mi 405Mi 688Mi
Swap: 2.0Gi 0B 2.0Gi

0x09.安装Aria2以备远程下载

安装:sudo apt-get install aria2 -y
创建配置文件夹:sudo mkdir /etc/aria2
创建session和配置文件:sudo touch /etc/aria2/aria2.sessionsudo touch /etc/aria2/aria2.conf
修改配置文件sudo vim /etc/aria2/aria2.conf

1
2
3
4
5
6
7
8
9
10
11
12
13
14
15
16
17
18
19
20
21
22
23
24
25
26
27
28
29
30
31
32
33
34
35
36
37
38
39
40
41
42
43
44
45
46
47
48
49
50
51
52
53
54
55
56
57
58
59
60
61
62
63
64
65
66
67
68
69
70
71
72
73
74
75
76
77
## 文件保存相关 ##

# 文件保存目录
dir=/media/pi/Swap
# 启用磁盘缓存, 0为禁用缓存, 需1.16以上版本, 默认:16M
disk-cache=32M
# 断点续传
continue=true
#同服务器连接数
max-connection-per-server=1

# 文件预分配方式, 能有效降低磁盘碎片, 默认:prealloc
# 预分配所需时间: none < falloc ? trunc < prealloc
# falloc和trunc则需要文件系统和内核支持
# NTFS建议使用falloc, EXT3/4建议trunc, MAC 下需要注释此项
file-allocation=prealloc
check-certificate=false

## 下载连接相关 ##

# 最大同时下载任务数, 运行时可修改, 默认:5
max-concurrent-downloads=5
# 同一服务器连接数, 添加时可指定, 默认:1
max-connection-per-server=1
# 整体下载速度限制, 运行时可修改, 默认:0(不限制)
max-overall-download-limit=0
# 单个任务下载速度限制, 默认:0(不限制)
max-download-limit=0
# 整体上传速度限制, 运行时可修改, 默认:0(不限制)
max-overall-upload-limit=0
# 单个任务上传速度限制, 默认:0(不限制)
max-upload-limit=0
# 禁用IPv6, 默认:false
disable-ipv6=true

# 最小文件分片大小, 添加时可指定, 取值范围1M -1024M, 默认:20M
# 假定size=10M, 文件为20MiB 则使用两个来源下载; 文件为15MiB 则使用一个来源下载
min-split-size=10M
# 单个任务最大线程数, 添加时可指定, 默认:5
split=5

## 进度保存相关 ##

# 从会话文件中读取下载任务
input-file=/etc/aria2/aria2.session
# 在Aria2退出时保存错误的、未完成的下载任务到会话文件
save-session=/etc/aria2/aria2.session
# 定时保存会话, 0为退出时才保存, 需1.16.1以上版本, 默认:0
save-session-interval=60

## RPC相关设置 ##

# 启用RPC, 默认:false
enable-rpc=true
# 允许所有来源, 默认:false
rpc-allow-origin-all=true
# 允许外部访问, 默认:false
rpc-listen-all=true
# RPC端口, 仅当默认端口被占用时修改
# rpc-listen-port=6800
# 设置的RPC授权令牌, v1.18.4新增功能, 取代 --rpc-user 和 --rpc-passwd 选项
rpc-secret=pandownload

## BT/PT下载相关 ##

# 当下载的是一个种子(以.torrent结尾)时, 自动开始BT任务, 默认:true
#follow-torrent=true
# 客户端伪装, PT需要
peer-id-prefix=-TR2770-
user-agent=Transmission/2.77
# 强制保存会话, 即使任务已经完成, 默认:false
# 较新的版本开启后会在任务完成后依然保留.aria2文件
#force-save=false
# 继续之前的BT任务时, 无需再次校验, 默认:false
bt-seed-unverified=true
# 保存磁力链接元数据为种子文件(.torrent文件), 默认:false
bt-save-metadata=true

后台运行:aria2c --conf-path=/etc/aria2/aria2.conf -D
添加开机自启:touch /etc/init.d/aria2c

1
2
3
4
5
6
7
8
9
10
11
12
13
14
15
16
17
18
19
20
21
22
23
24
25
26
27
28
#!/bin/sh
### BEGIN INIT INFO
# Provides: aria2c
# Required-Start: $network $local_fs $remote_fs
# Required-Stop: $network $local_fs $remote_fs
# Default-Start: 2 3 4 5
# Default-Stop: 0 1 6
# Short-Description: aria2c RPC init script.
# Description: Starts and stops aria2 RPC services.
### END INIT INFO

USER=root
RETVAL=0

case "$1" in
start)
echo "Starting service Aria2..."
aria2c --conf-path=/etc/aria2/aria2.conf -D
echo "Start service done."
;;
stop)
echo "Stoping service Aria2..."
killall aria2c
echo "Stop service done."
;;
esac

exit $RETVAL

赋予可执行权限:chmod +x /etc/init.d/aria2c
添加/etc/init.d/aria2c start/etc/rc.localexit 0之前
apt-get -y install chkconfigchkconfig --add aria2c

0x10.安装Nginx

源于习惯本来想用Apache的,但是翻了翻感觉还是换个轻量级的较好,于是换成Nginx了。可以在上面放webui-aria2这种纯静态页面,但是后来被我移到腾讯云的Apache上了……(看到某人说的也就能支撑100用户在线……

1
2
3
4
5
6
7
pi@rpi:~ $ sudo apt install nginx -y
pi@rpi:~ $ sudo systemctl enable nginx
Synchronizing state of nginx.service with SysV service script with /lib/systemd/systemd-sysv-install.
Executing: /lib/systemd/systemd-sysv-install enable nginx
pi@rpi:~ $ sudo rm -rf /var/www/html
pi@rpi:~ $ sudo git clone https://github.com/ziahamza/webui-aria2.git /var/www/html
pi@rpi:~ $ sudo systemctl start nginx

开机自启:编辑/etc/rc.local添加/etc/init.d/nginx start

0x11.手动编译支持硬解的FFmpeg

参考引用第三条
上个版本系统可以编译出ffplayffprobeffserver。但是最新版本的系统编译ffplay的依赖处理关系又问题,暂时先搁置一段时间

0x12.GPIO驱动JLX12864G-086-PC

这显示屏原本是51单片机课设所用,官方有驱动文件,所以就移(复)植(制)过来了,后续还会单独发相关内容,所以就简单写了。
我只用到了wiringPiSetup()pinModedigitalWritedigitalRead这四个库函数。
编译:gcc -Wall -o 12864g-86-pc.c 12864g-86-pc -lwiringPi
运行:sudo ./test(控制GPIO需要用到sudo权限)
在这里叙述个开机执行二进制内容的方法:
1.制作sh脚本,同级目录创建start.sh,内容(按需更改):

1
2
3
#!/bin/sh
cd 路径
sudo ./12864g-86-pc

2.修改start.sh权限:
sudo chmod 777 start.sh

3.向rc.local添加我们制作的这个脚本,用于开机启动:
sudo vim /etc/rc.local
exit 0之前添加如下内容:路径/start.sh start

0x13.播放音频杂音问题

最新版本镜像该问题已不存在,参考引用第十条
sudo vim /boot/config.txt
audio_pwm_mode = 2
重启生效,在之前的镜像中改变还是很明显的。

0x14.安装Docker

参照Install Docker Engine on Debian

安装
安装

Raspbian users cannot use this method!

For Raspbian, installing using the repository is not yet supported. You must instead use the convenience script.

也就是说只能通过脚本安装

1
2
3
4
5
6
7
8
9
10
11
12
13
14
15
16
17
18
19
20
21
22
23
24
25
26
27
28
29
30
31
32
33
34
35
36
37
38
39
40
41
42
43
44
45
46
47
48
49
50
51
52
53
54
55
56
57
58
59
60
61
62
63
64
65
66
67
68
69
70
71
72
73
74
75
76
77
78
79
80
81
82
83
84
85
86
87
88
89
90
91
92
93
94
95
96
97
98
99
100
101
pi@rpi-slave:~/Downloads $ ls
pi@rpi-slave:~/Downloads $ curl -fsSL https://get.docker.com -o get-docker.sh
pi@rpi-slave:~/Downloads $ sudo sh get-docker.sh
# Executing docker install script, commit: 3d8fe77c2c46c5b7571f94b42793905e5b3e42e4
+ sh -c apt-get update -qq >/dev/null
+ sh -c DEBIAN_FRONTEND=noninteractive apt-get install -y -qq apt-transport-https ca-certificates curl >/dev/null
+ sh -c curl -fsSL "https://download.docker.com/linux/raspbian/gpg" | apt-key add -qq - >/dev/null
Warning: apt-key output should not be parsed (stdout is not a terminal)
+ sh -c echo "deb [arch=armhf] https://download.docker.com/linux/raspbian buster stable" > /etc/apt/sources.list.d/docker.list
+ sh -c apt-get update -qq >/dev/null
+ [ -n ]
+ sh -c apt-get install -y -qq --no-install-recommends docker-ce >/dev/null
+ sh -c docker version
Client: Docker Engine - Community
Version: 20.10.5
API version: 1.41
Go version: go1.13.15
Git commit: 55c4c88
Built: Tue Mar 2 20:18:46 2021
OS/Arch: linux/arm
Context: default
Experimental: true

Server: Docker Engine - Community
Engine:
Version: 20.10.5
API version: 1.41 (minimum version 1.12)
Go version: go1.13.15
Git commit: 363e9a8
Built: Tue Mar 2 20:16:18 2021
OS/Arch: linux/arm
Experimental: false
containerd:
Version: 1.4.3
GitCommit: 269548fa27e0089a8b8278fc4fc781d7f65a939b
runc:
Version: 1.0.0-rc92
GitCommit: ff819c7e9184c13b7c2607fe6c30ae19403a7aff
docker-init:
Version: 0.19.0
GitCommit: de40ad0
If you would like to use Docker as a non-root user, you should now consider
adding your user to the "docker" group with something like:

sudo usermod -aG docker your-user

Remember that you will have to log out and back in for this to take effect!

WARNING: Adding a user to the "docker" group will grant the ability to run
containers which can be used to obtain root privileges on the
docker host.
Refer to https://docs.docker.com/engine/security/security/#docker-daemon-attack-surface
for more information.
pi@rpi-slave:~/Downloads $ sudo usermod -aG docker $USER
pi@rpi-slave:~/Downloads $ sudo systemctl enable docker
Synchronizing state of docker.service with SysV service script with /lib/systemd/systemd-sysv-install.
Executing: /lib/systemd/systemd-sysv-install enable docker
pi@rpi-slave:~ $ mkdir -p /etc/docker
pi@rpi-slave:~ $ sudo vim /etc/docker/daemon.json
{
"registry-mirrors":["https://docker.mirrors.ustc.edu.cn"]
}
pi@rpi-slave:~ $ sudo systemctl daemon-reload
pi@rpi-slave:~ $ sudo systemctl restart docker
pi@rpi-slave:~ $ docker run arm32v7/hello-world
Unable to find image 'arm32v7/hello-world:latest' locally
latest: Pulling from arm32v7/hello-world
4ee5c797bcd7: Pull complete
Digest: sha256:d32a4c07ce3055032a8d2d59f49ca55fafc54a4e840483b590f7565769dc7e00
Status: Downloaded newer image for arm32v7/hello-world:latest

Hello from Docker!
This message shows that your installation appears to be working correctly.

To generate this message, Docker took the following steps:
1. The Docker client contacted the Docker daemon.
2. The Docker daemon pulled the "hello-world" image from the Docker Hub.
(arm32v7)
3. The Docker daemon created a new container from that image which runs the
executable that produces the output you are currently reading.
4. The Docker daemon streamed that output to the Docker client, which sent it
to your terminal.

To try something more ambitious, you can run an Ubuntu container with:
$ docker run -it ubuntu bash

Share images, automate workflows, and more with a free Docker ID:
https://hub.docker.com/

For more examples and ideas, visit:
https://docs.docker.com/get-started/

pi@rpi-slave:~ $ docker pull portainer/portainer
Using default tag: latest
latest: Pulling from portainer/portainer
Digest: sha256:f8c2b0a9ca640edf508a8a0830cf1963a1e0d2fd9936a64104b3f658e120b868
Status: Image is up to date for portainer/portainer:latest
docker.io/portainer/portainer:latest
pi@rpi-slave:~ $ docker volume create portainer_data
portainer_data
pi@rpi-slave:~ $ docker run -d -p 9000:9000 --name portainer --restart always -v /var/run/docker.sock:/var/run/docker.sock -v portainer_data:/data portainer/portainer

0x15.安装Tensorflow Lite

选择Python 3.x + Tensorflow v1.13.1
sudo pip3 uninstall tensorflow

1
2
3
4
5
6
7
8
9
10
11
12
13
14
15
16
17
18
19
20
21
22
23
24
25
26
27
28
29
30
pi@rpi:~/Downloads $ sudo pip3 install tensorflow-1.13.1-cp35-cp35m-linux_armv7l.whl 
Looking in indexes: https://pypi.org/simple, https://www.piwheels.org/simple
Processing ./tensorflow-1.13.1-cp35-cp35m-linux_armv7l.whl
Requirement already satisfied: grpcio>=1.8.6 in /usr/local/lib/python3.5/dist-packages (from tensorflow==1.13.1) (1.19.0)
Collecting tensorboard<1.14.0,>=1.13.0 (from tensorflow==1.13.1)
Downloading https://files.pythonhosted.org/packages/0f/39/bdd75b08a6fba41f098b6cb091b9e8c7a80e1b4d679a581a0ccd17b10373/tensorboard-1.13.1-py3-none-any.whl (3.2MB)
|████████████████████████████████| 3.2MB 411kB/s
Requirement already satisfied: six>=1.10.0 in /usr/lib/python3/dist-packages (from tensorflow==1.13.1) (1.12.0)
Requirement already satisfied: astor>=0.6.0 in /usr/local/lib/python3.5/dist-packages (from tensorflow==1.13.1) (0.7.1)
Requirement already satisfied: wheel>=0.26 in /usr/lib/python3/dist-packages (from tensorflow==1.13.1) (0.29.0)
Collecting tensorflow-estimator<1.14.0rc0,>=1.13.0 (from tensorflow==1.13.1)
Using cached https://files.pythonhosted.org/packages/bb/48/13f49fc3fa0fdf916aa1419013bb8f2ad09674c275b4046d5ee669a46873/tensorflow_estimator-1.13.0-py2.py3-none-any.whl
Requirement already satisfied: absl-py>=0.1.6 in /usr/local/lib/python3.5/dist-packages (from tensorflow==1.13.1) (0.7.0)
Requirement already satisfied: termcolor>=1.1.0 in /usr/local/lib/python3.5/dist-packages (from tensorflow==1.13.1) (1.1.0)
Requirement already satisfied: numpy>=1.13.3 in /usr/local/lib/python3.5/dist-packages (from tensorflow==1.13.1) (1.16.2)
Requirement already satisfied: keras-applications>=1.0.6 in /usr/local/lib/python3.5/dist-packages (from tensorflow==1.13.1) (1.0.7)
Requirement already satisfied: keras-preprocessing>=1.0.5 in /usr/local/lib/python3.5/dist-packages (from tensorflow==1.13.1) (1.0.9)
Requirement already satisfied: gast>=0.2.0 in /usr/local/lib/python3.5/dist-packages (from tensorflow==1.13.1) (0.2.2)
Requirement already satisfied: protobuf>=3.6.1 in /usr/local/lib/python3.5/dist-packages (from tensorflow==1.13.1) (3.7.0)
Requirement already satisfied: werkzeug>=0.11.15 in /usr/lib/python3/dist-packages (from tensorboard<1.14.0,>=1.13.0->tensorflow==1.13.1) (0.11.15)
Requirement already satisfied: markdown>=2.6.8 in /usr/local/lib/python3.5/dist-packages (from tensorboard<1.14.0,>=1.13.0->tensorflow==1.13.1) (3.0.1)
Collecting mock>=2.0.0 (from tensorflow-estimator<1.14.0rc0,>=1.13.0->tensorflow==1.13.1)
Downloading https://files.pythonhosted.org/packages/05/d2/f94e68be6b17f46d2c353564da56e6fb89ef09faeeff3313a046cb810ca9/mock-3.0.5-py2.py3-none-any.whl
Requirement already satisfied: h5py in /usr/local/lib/python3.5/dist-packages (from keras-applications>=1.0.6->tensorflow==1.13.1) (2.9.0)
Requirement already satisfied: setuptools in /usr/lib/python3/dist-packages (from protobuf>=3.6.1->tensorflow==1.13.1) (33.1.1)
Installing collected packages: tensorboard, mock, tensorflow-estimator, tensorflow
Found existing installation: tensorboard 1.11.0
Uninstalling tensorboard-1.11.0:
Successfully uninstalled tensorboard-1.11.0
Successfully installed mock-3.0.5 tensorboard-1.13.1 tensorflow-1.13.1 tensorflow-estimator-1.13.0

Operation check

1
2
3
4
5
6
7
8
9
pi@rpi:~ $ python3
Python 3.5.3 (default, Sep 27 2018, 17:25:39)
[GCC 6.3.0 20170516] on linux
Type "help", "copyright", "credits" or "license" for more information.
>>> import tensorflow
>>> tensorflow.__version__
'1.13.1'
>>> exit()
pi@rpi:~ $

Sample of MultiThread x4

1
2
3
4
5
6
$ cd ~;mkdir test
$ curl https://raw.githubusercontent.com/tensorflow/tensorflow/master/tensorflow/lite/examples/label_image/testdata/grace_hopper.bmp > ~/test/grace_hopper.bmp
$ curl https://storage.googleapis.com/download.tensorflow.org/models/mobilenet_v1_1.0_224_frozen.tgz | tar xzv -C ~/test mobilenet_v1_1.0_224/labels.txt
$ mv ~/test/mobilenet_v1_1.0_224/labels.txt ~/test/
$ curl http://download.tensorflow.org/models/mobilenet_v1_2018_02_22/mobilenet_v1_1.0_224_quant.tgz | tar xzv -C ~/test
$ cp tensorflow/tensorflow/contrib/lite/examples/python/label_image.py ~/test

测试结果:

1
2
3
4
5
6
7
8
9
10
11
12
13
14
15
16
17
18
19
20
21
22
pi@rpi:~/test $ python3 label_image.py \
> --num_threads 1 \
> --image grace_hopper.bmp \
> --model_file mobilenet_v1_1.0_224_quant.tflite \
> --label_file labels.txt
0.415686: 653:military uniform
0.352941: 907:Windsor tie
0.058824: 668:mortarboard
0.035294: 458:bow tie, bow-tie, bowtie
0.035294: 835:suit, suit of clothes
time: 0.4737093448638916
pi@rpi:~/test $ python3 label_image.py \
> --num_threads 4 \
> --image grace_hopper.bmp \
> --model_file mobilenet_v1_1.0_224_quant.tflite \
> --label_file labels.txt
0.415686: 653:military uniform
0.352941: 907:Windsor tie
0.058824: 668:mortarboard
0.035294: 458:bow tie, bow-tie, bowtie
0.035294: 835:suit, suit of clothes
time: 0.19170689582824707

0x16.禁用无线网卡

板载无线网卡莫名坏掉了,可能是静电损坏……反正那天在学校走廊拿出来,上电之后就再也连不上了草,sudo ifconfig eth0 down:重启失效……
故使用配置文件禁用无线网卡驱动,sudo apt install lshw

1
2
3
4
5
6
7
8
9
10
11
12
13
14
15
16
17
18
19
20
21
22
23
24
25
26
27
28
29
30
31
32
33
34
35
36
37
38
39
40
41
42
43
44
45
46
47
48
49
50
51
52
53
54
55
56
57
58
59
60
61
62
63
64
65
66
67
68
69
70
71
72
73
74
75
76
77
78
79
80
81
82
83
84
85
86
87
88
89
90
91
92
93
94
pi@rpi-slave:~ $ sudo lshw
rpi-slave
description: Computer
product: Raspberry Pi 3 Model B Rev 1.2
serial: <rm>
width: 32 bits
capabilities: smp cp15_barrier setend swp tagged_addr_disabled
*-core
description: Motherboard
physical id: 0
*-cpu:0
description: CPU
product: cpu
physical id: 0
bus info: cpu@0
size: 1200MHz
capacity: 1200MHz
capabilities: fp asimd evtstrm crc32 cpuid cpufreq
*-cpu:1
description: CPU
product: cpu
physical id: 1
bus info: cpu@1
size: 1200MHz
capacity: 1200MHz
capabilities: fp asimd evtstrm crc32 cpuid cpufreq
*-cpu:2
description: CPU
product: cpu
physical id: 2
bus info: cpu@2
size: 1200MHz
capacity: 1200MHz
capabilities: fp asimd evtstrm crc32 cpuid cpufreq
*-cpu:3
description: CPU
product: cpu
physical id: 3
bus info: cpu@3
size: 1200MHz
capacity: 1200MHz
capabilities: fp asimd evtstrm crc32 cpuid cpufreq
*-memory
description: System memory
physical id: 4
size: 910MiB
*-usbhost
product: DWC OTG Controller
vendor: Linux 5.10.17-v8+ dwc_otg_hcd
physical id: 1
bus info: usb@1
logical name: usb1
version: 5.10
capabilities: usb-2.00
configuration: driver=hub slots=1 speed=480Mbit/s
*-usb
description: USB hub
product: SMC9514 Hub
vendor: Standard Microsystems Corp.
physical id: 1
bus info: usb@1:1
version: 2.00
capabilities: usb-2.00
configuration: driver=hub maxpower=2mA slots=5 speed=480Mbit/s
*-usb:0
description: Ethernet interface
product: SMSC9512/9514 Fast Ethernet Adapter
vendor: Standard Microsystems Corp.
physical id: 1
bus info: usb@1:1.1
logical name: eth0
version: 2.00
serial: <rm>
capacity: 100Mbit/s
capabilities: usb-2.00 ethernet physical tp mii 10bt 10bt-fd 100bt 100bt-fd autonegotiation
configuration: autonegotiation=on broadcast=yes driver=smsc95xx driverversion=5.10.17-v8+ firmware=smsc95xx USB 2.0 Ethernet link=no maxpower=2mA multicast=yes port=MII speed=480Mbit/s
*-usb:1
description: Generic USB device
product: 802.11 n WLAN
vendor: MediaTek
physical id: 5
bus info: usb@1:1.5
version: 0.00
serial: 1.0
capabilities: usb-2.01
configuration: driver=mt7601u maxpower=160mA speed=480Mbit/s
*-network
description: Wireless interface
physical id: 2
bus info: usb@1:1.5
logical name: wlan0
serial: <rm>
capabilities: ethernet physical wireless
configuration: broadcast=yes driver=mt7601u driverversion=5.10.17-v8+ firmware=N/A ip=192.168.25.130 link=yes multicast=yes wireless=IEEE 802.11

执行命令以后查看network:0 description: Wireless interface在这个里面找到driver=brcmfmac那么这个brcmfmac就是驱动名称
记好你的机器显示的那个名称(我不确定大家是不是都一样),然后创建内容为blacklist brcmfmac的文件/etc/modprobe.d/blacklist-brcmfmac.conf

0x17.查看版本

1
2
3
4
5
6
7
8
getconf LONG_BIT                            # 系统位数
uname -a # 内核版本
/opt/vc/bin/vcgencmd version # 固件版本
strings /boot/start.elf | grep VC_BUILD_ID # 固件版本
cat /proc/version # 完整内核版本
cat /etc/os-release # 系统版本
cat /etc/issue # Linux distro 版本
cat /etc/debian_version # Debian 版本编号

0x18.引用

树莓派3B新版raspbian系统换国内源
修改树莓派交换分区 SWAP 的正确姿势
玩转树莓派02——搭建下载机
树莓派驱动的b站直播弹幕点播台
ffmpeg源码编译安装(Compile ffmpeg with source) Part 2 : 扩展安装
树莓派编译安装FFmpeg(添加H.264硬件编解码器支持)
树莓派 GPIO 控制
树莓派开机自动运行某程序.md
【教程】树莓派程序开机自启动方法总结
树莓派音频口底噪太大的解决办法

树莓派 b 站直播相关

三步在树莓派上部署nginx+uWSGI+flask

树莓派永久禁用无线网卡
[常見問與答] 如何看 Raspbian 的版本資訊?

SD-Card-Overclock