三月已经过去,四月会变好吗?

0x00.前言

红帽企业级Linux的操作体验实在是tql

0x01.配置EPEL源以安装htop

1
2
3
[root@cn-py-dl-r8 ~]# dnf install https://dl.fedoraproject.org/pub/epel/epel-release-latest-8.noarch.rpm
[root@cn-py-dl-r8 ~]# dnf update -y
[root@cn-py-dl-r8 ~]# dnf install htop -y

0x02.git全局配置

1
2
3
4
5
[root@cn-py-dl-r8 ~]# git config --global user.name "yuangezhizao-serveraccount"
[root@cn-py-dl-r8 ~]# git config --global user.email yuangezhizao@gmail.com
[root@cn-py-dl-r8 ~]# git commit --amend --reset-author
fatal: not a git repository (or any of the parent directories): .git
[root@cn-py-dl-r8 ~]# git config --global credential.helper store

0x03.SELINUX切换至Permissive模式

只能说对于家用LAB环境为了根本用不上的过分安全,去折腾这玩楞是大可不必的,又不是生产环境为啥要难为自己呢?节省掉的时间多补几部番它不香吗?
参照官方文档:更改 SELINUX 状态和模式

1
2
3
4
5
6
7
8
9
10
11
12
13
[root@cn-py-dl-r8 ~]# getenforce
Enforcing
[root@cn-py-dl-r8 ~]# sestatus
SELinux status: enabled
SELinuxfs mount: /sys/fs/selinux
SELinux root directory: /etc/selinux
Loaded policy name: targeted
Current mode: enforcing
Mode from config file: enforcing
Policy MLS status: enabled
Policy deny_unknown status: allowed
Memory protection checking: actual (secure)
Max kernel policy version: 33

本来是准备直接关了了事,结果发现文档中说

/etc/selinux/config中使用SELINUX=disabled选项禁用SELinux的结果是,内核在引导时首先启用SELinux,并在后续的引导过程后切换到禁用模式。因为内存泄漏和竞争条件会导致内核panics,如果您的情况确实需要完全禁用SELinux,则首选的方法是,在内核命令行中添加 selinux=0参数(如引导时更改SELinux模式)所述

好吧,那就先切换到Permissive模式吧

1
2
3
4
5
6
7
8
9
10
11
12
13
[root@cn-py-dl-r8 ~]# cat /etc/selinux/config
# This file controls the state of SELinux on the system.
# SELINUX= can take one of these three values:
# enforcing - SELinux security policy is enforced.
# permissive - SELinux prints warnings instead of enforcing.
# disabled - No SELinux policy is loaded.
SELINUX=permissive
# SELINUXTYPE= can take one of these three values:
# targeted - Targeted processes are protected,
# minimum - Modification of targeted policy. Only selected processes are protected.
# mls - Multi Level Security protection.
SELINUXTYPE=targeted
[root@cn-py-dl-r8 ~]# reboot

0x04.安装Docker

不过docker并不是自带的,需要手动安装,RHEL下未安装时会提示安装podman-docker

1
2
3
4
5
6
7
8
9
10
11
12
13
14
15
16
17
18
19
20
21
22
23
24
25
26
[root@cn-py-dl-r8 docker]# docker
bash: docker: command not found...
Install package 'podman-docker' to provide command 'docker'? [N/y] y


* Waiting in queue...
* Loading list of packages....
The following packages have to be installed:
podman-docker-1:3.4.2-9.module+el8.5.0+13852+150547f7.noarch Emulate Docker CLI using podman
Proceed with changes? [N/y] y


* Waiting in queue...
* Waiting for authentication...
* Waiting in queue...
* Downloading packages...
* Requesting data...
* Testing changes...
* Installing packages...
Emulate Docker CLI using podman. Create /etc/containers/nodocker to quiet msg.
Error: missing command 'podman COMMAND'
Try 'podman --help' for more information.

[root@cn-py-dl-r8 docker]# docker ps
Emulate Docker CLI using podman. Create /etc/containers/nodocker to quiet msg.
CONTAINER ID IMAGE COMMAND CREATED STATUS PORTS NAMES

然后惯例安装portainer可视化

1
2
3
4
5
[root@cn-py-dl-r8 ~]# docker pull portainer/portainer:latest
[root@cn-py-dl-r8 ~]# docker volume create portainer_data
[root@cn-py-dl-r8 ~]# docker run -d -p 9000:9000 --name=portainer --restart=always -v /var/run/docker.sock:/var/run/docker.sock -v portainer_data:/data portainer/portainer
Emulate Docker CLI using podman. Create /etc/containers/nodocker to quiet msg.
Error: statfs /var/run/docker.sock: no such file or directory

不过在RHELdocker并未默认开放api访问,并不能直接成功创建容器,需要手动开启,可参照:https://docs.podman.io/en/v3.2.3/_static/api.html

1
2
3
4
5
6
7
[root@cn-py-dl-r8 ~]# podman system service -t 0 &
[1] 108648
[root@cn-py-dl-r8 ~]# ll /var/run | grep "docker.sock"
lrwxrwxrwx. 1 root root 23 Mar 28 22:16 docker.sock -> /run/podman/podman.sock
[root@cn-py-dl-r8 ~]# docker run -d -p 9000:9000 --name=portainer --restart=always -v /var/run/docker.sock:/var/run/docker.sock -v portainer_data:/data portainer/portainer
Emulate Docker CLI using podman. Create /etc/containers/nodocker to quiet msg.
123ced8912a5d1557531d2b9d645aa71061763b5f65d52cef6e5a204f3ad61fb

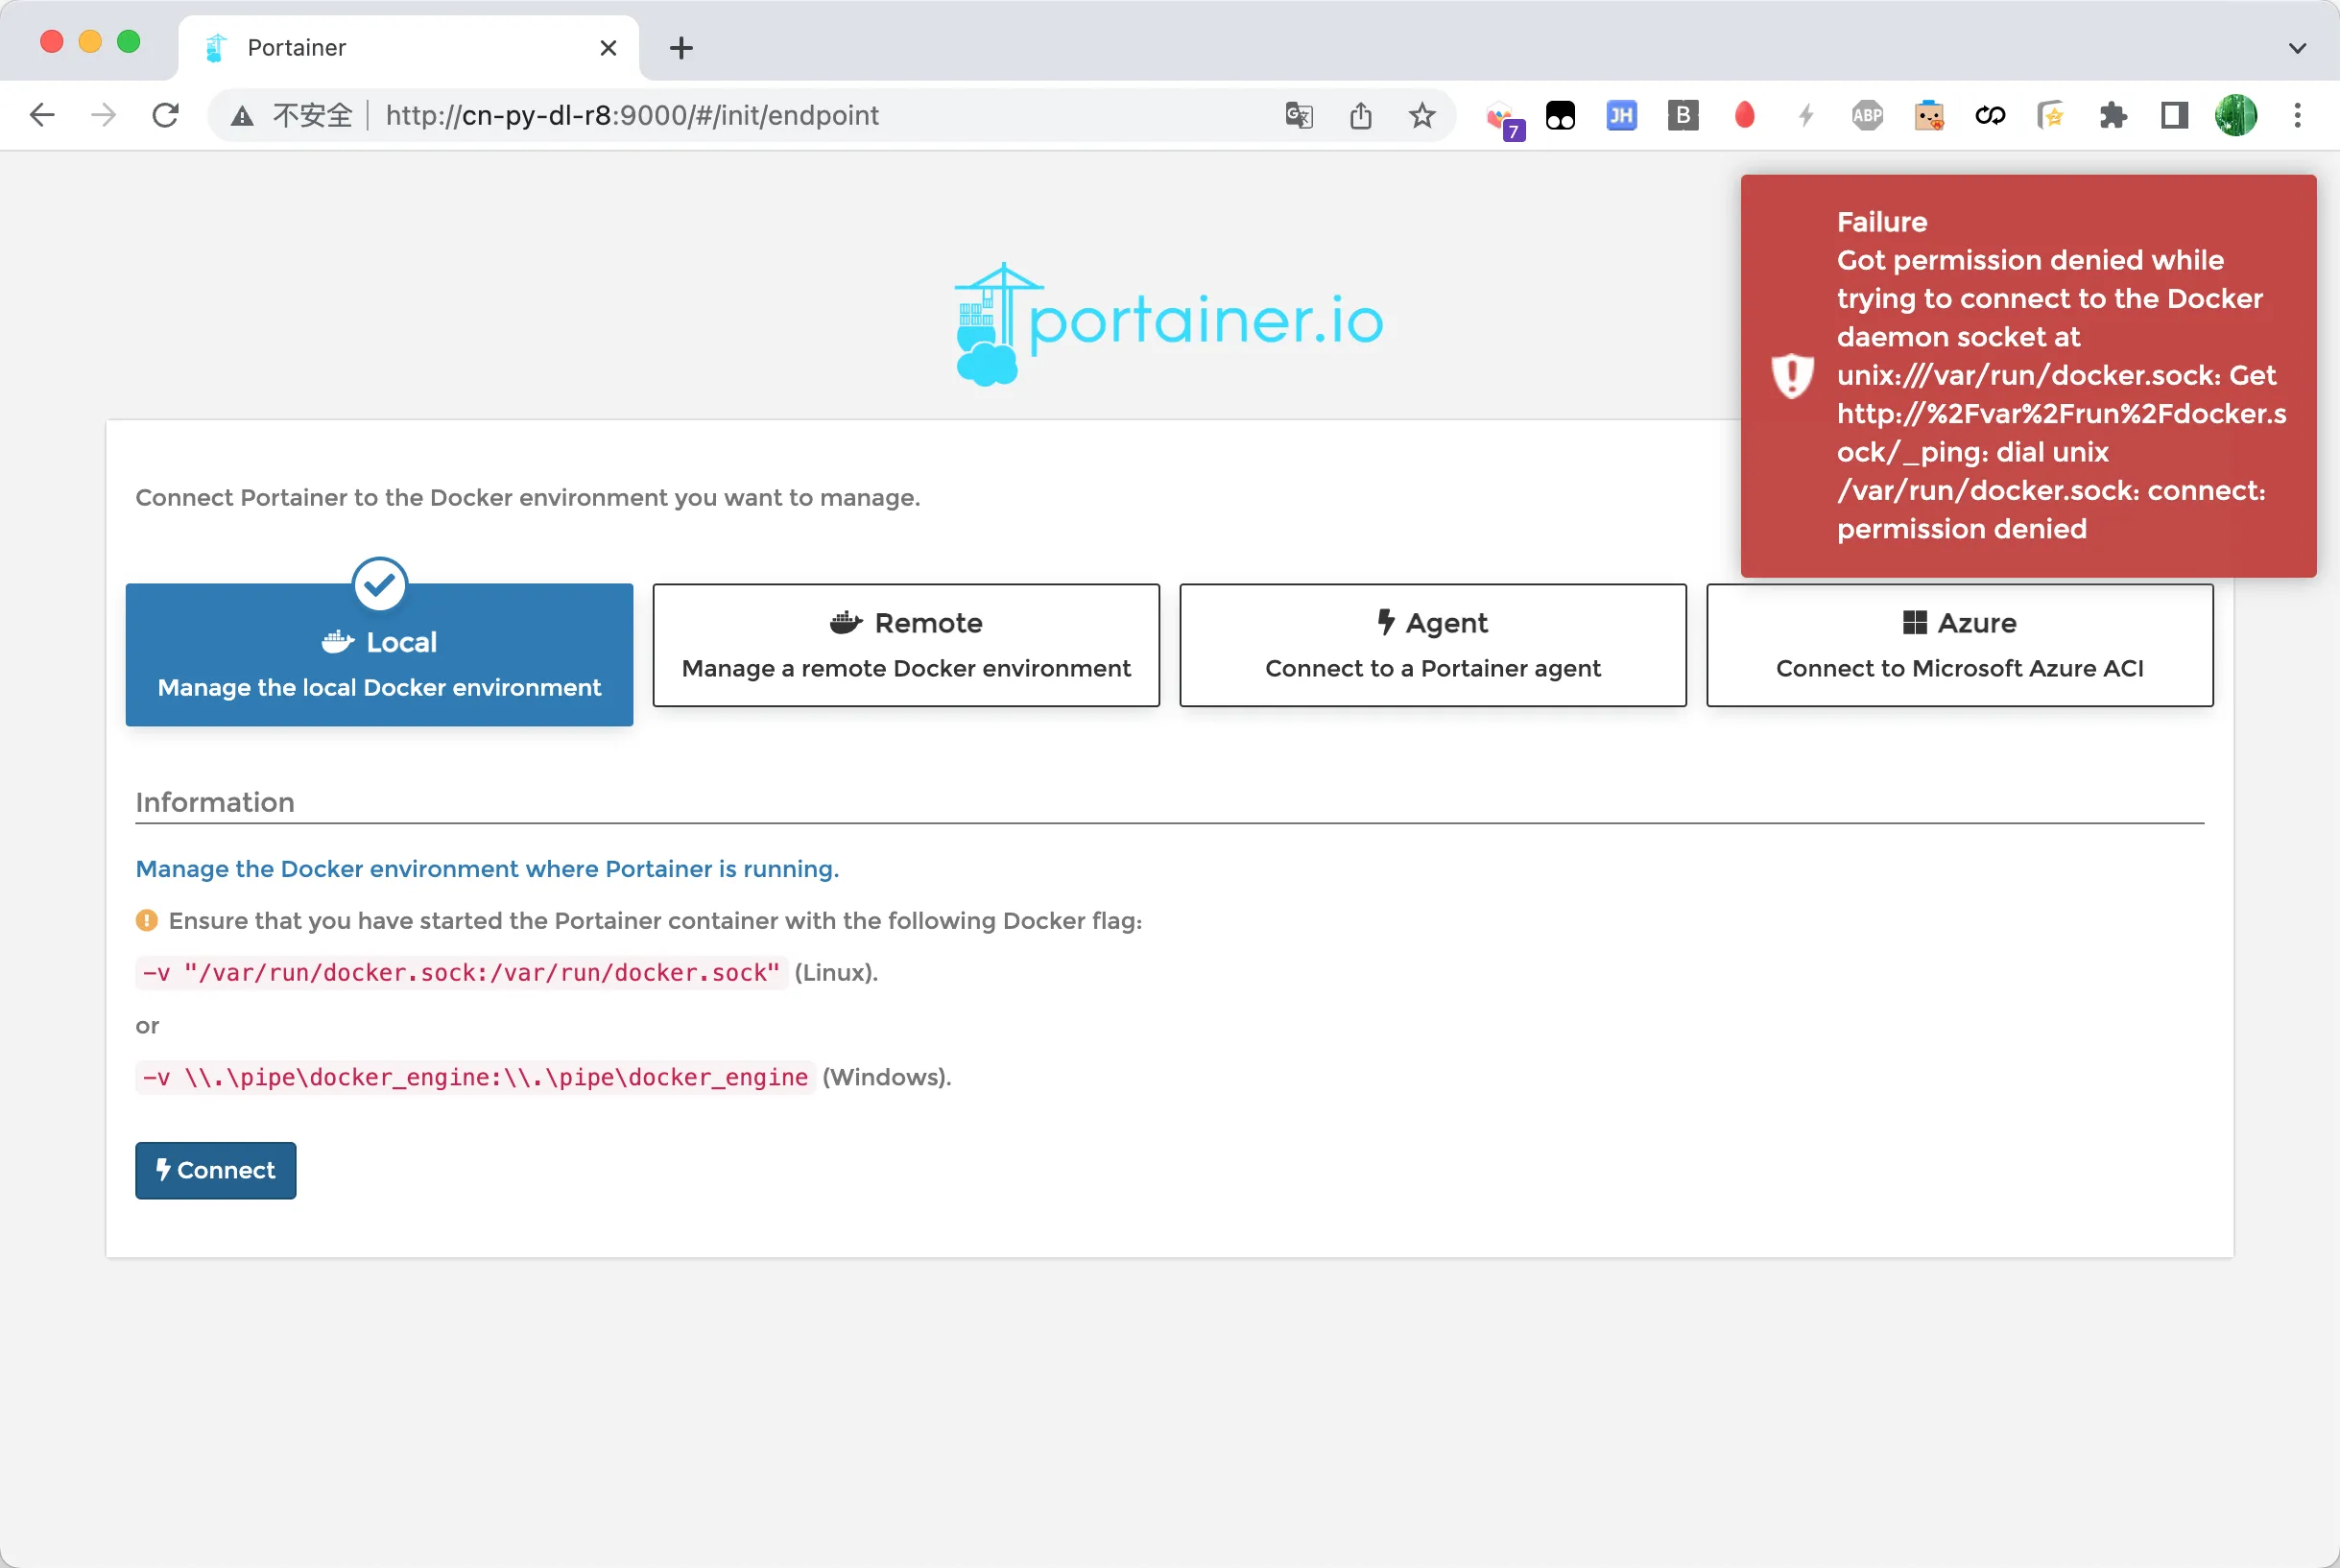
创建成功之后在防火墙中开放端口,结果报错Got permission denied while trying to connect to the Docker daemon socket at unix:///var/run/docker.sock: Get http://%2Fvar%2Frun%2Fdocker.sock/_ping: dial unix /var/run/docker.sock: connect: permission denied

寄

于是又去谷歌搜了一圈,这里未尝试:https://github.com/dpw/selinux-dockersock
仅尝试在-v后添加小写的:z或者大写的:Z,结果还是不行
docker run -d -p 9000:9000 --name=portainer --restart=always -v /var/run/docker.sock:/var/run/docker.sock:Z -v portainer_data:/data portainer/portainer

一气之下加上--privileged,先凑合用吧XD
docker run -d --privileged -p 9000:9000 --name=portainer --restart=always -v /var/run/docker.sock:/var/run/docker.sock -v portainer_data:/data portainer/portainer

0x05.安装Docker-Compose

接下来安装docker-compose,没配代理太慢了……

1
2
3
4
5
[root@cn-py-dl-r8 ~]# wget "https://github.com/docker/compose/releases/download/1.29.2/docker-compose-$(uname -s)-$(uname -m)"
--2022-03-28 22:19:11-- https://github.com/docker/compose/releases/download/1.29.2/docker-compose-Linux-x86_64
Resolving github.com (github.com)... 192.30.255.113
Connecting to github.com (github.com)|192.30.255.113|:443... connected.
HTTP request sent, awaiting response... 302 Found

MacMini上下载完,拿sftp传上去也比下载快2333

1
2
3
4
sftp> put docker-compose-Linux-x86_64
Uploading docker-compose-Linux-x86_64 to /root/docker-compose-Linux-x86_64
100% 12438KB 12438KB/s 00:00:00
/Users/yuangezhizao/Downloads/docker-compose-Linux-x86_64: 12737304 bytes transferred in 0 seconds (12438 KB/s)

不过也得开启dockerapi,否则运行也会报错

点击此处 ← 查看折叠
1
2
3
4
5
6
7
8
9
10
11
12
13
14
15
16
17
18
19
20
21
22
23
24
25
26
27
28
29
30
31
32
33
34
35
36
37
38
39
40
41
42
43
44
45
46
47
48
49
50
51
52
53
54
55
56
57
58
59
60
61
62
[root@cn-py-dl-r8 ~]# mv docker-compose-Linux-x86_64 /usr/local/bin/docker-compose
mv: overwrite '/usr/local/bin/docker-compose'? y
[root@cn-py-dl-r8 ~]# chmod +x /usr/local/bin/docker-compose
[root@cn-py-dl-r8 ~]# docker-compose --version
docker-compose version 1.29.2, build 5becea4c
[root@cn-py-dl-r8 ~]# cd uptime-kuma/docker/
[root@cn-py-dl-r8 docker]# docker-compose up -d
Traceback (most recent call last):
File "urllib3/connectionpool.py", line 677, in urlopen
File "urllib3/connectionpool.py", line 392, in _make_request
File "http/client.py", line 1277, in request
File "http/client.py", line 1323, in _send_request
File "http/client.py", line 1272, in endheaders
File "http/client.py", line 1032, in _send_output
File "http/client.py", line 972, in send
File "docker/transport/unixconn.py", line 43, in connect
FileNotFoundError: [Errno 2] No such file or directory

During handling of the above exception, another exception occurred:

Traceback (most recent call last):
File "requests/adapters.py", line 449, in send
File "urllib3/connectionpool.py", line 727, in urlopen
File "urllib3/util/retry.py", line 410, in increment
File "urllib3/packages/six.py", line 734, in reraise
File "urllib3/connectionpool.py", line 677, in urlopen
File "urllib3/connectionpool.py", line 392, in _make_request
File "http/client.py", line 1277, in request
File "http/client.py", line 1323, in _send_request
File "http/client.py", line 1272, in endheaders
File "http/client.py", line 1032, in _send_output
File "http/client.py", line 972, in send
File "docker/transport/unixconn.py", line 43, in connect
urllib3.exceptions.ProtocolError: ('Connection aborted.', FileNotFoundError(2, 'No such file or directory'))

During handling of the above exception, another exception occurred:

Traceback (most recent call last):
File "docker/api/client.py", line 214, in _retrieve_server_version
File "docker/api/daemon.py", line 181, in version
File "docker/utils/decorators.py", line 46, in inner
File "docker/api/client.py", line 237, in _get
File "requests/sessions.py", line 543, in get
File "requests/sessions.py", line 530, in request
File "requests/sessions.py", line 643, in send
File "requests/adapters.py", line 498, in send
requests.exceptions.ConnectionError: ('Connection aborted.', FileNotFoundError(2, 'No such file or directory'))

During handling of the above exception, another exception occurred:

Traceback (most recent call last):
File "docker-compose", line 3, in <module>
File "compose/cli/main.py", line 81, in main
File "compose/cli/main.py", line 200, in perform_command
File "compose/cli/command.py", line 70, in project_from_options
File "compose/cli/command.py", line 153, in get_project
File "compose/cli/docker_client.py", line 43, in get_client
File "compose/cli/docker_client.py", line 170, in docker_client
File "docker/api/client.py", line 197, in __init__
File "docker/api/client.py", line 222, in _retrieve_server_version
docker.errors.DockerException: Error while fetching server API version: ('Connection aborted.', FileNotFoundError(2, 'No such file or directory'))
[21676] Failed to execute script docker-compose

0x06.安装Uptime Kuma

开幕就被智能提示惊艳到了,上一次类似的体验还是thefuck

1
2
3
4
5
6
7
8
9
10
11
12
13
14
15
16
17
18
19
20
21
22
23
Activate the web console with: systemctl enable --now cockpit.socket

Last login: Sun Mar 27 17:54:05 2022 from 192.168.25.123
[root@cn-py-dl-r8 ~]# git clone https://github.com/louislam/uptime-kuma.git
bash: git: command not found...
Install package 'git-core' to provide command 'git'? [N/y] y


* Waiting in queue...
* Loading list of packages....
The following packages have to be installed:
git-core-2.27.0-1.el8.x86_64 Core package of git with minimal functionality
Proceed with changes? [N/y] y


* Waiting in queue...
* Waiting for authentication...
* Waiting in queue...
* Downloading packages...
* Requesting data...
* Testing changes...
* Installing packages...
Cloning into 'uptime-kuma'...

拉取镜像时发现可以选择多种源,但是显然只有docker的源是可用的

1
2
3
4
5
6
7
8
9
10
11
12
13
14
15
16
17
18
19
20
21
22
23
24
25
26
27
28
29
30
31
[root@cn-py-dl-r8 ~]# docker pull louislam/uptime-kuma
Emulate Docker CLI using podman. Create /etc/containers/nodocker to quiet msg.
? Please select an image:
▸ registry.fedoraproject.org/louislam/uptime-kuma:1
registry.access.redhat.com/louislam/uptime-kuma:1
registry.centos.org/louislam/uptime-kuma:1
docker.io/louislam/uptime-kuma:1
✔ registry.fedoraproject.org/louislam/uptime-kuma:1
Trying to pull registry.fedoraproject.org/louislam/uptime-kuma:1...
Error: initializing source docker://registry.fedoraproject.org/louislam/uptime-kuma:1: reading manifest 1 in registry.fedoraproject.org/louislam/uptime-kuma: manifest unknown: manifest unknown
✔ registry.access.redhat.com/louislam/uptime-kuma:1
Trying to pull registry.access.redhat.com/louislam/uptime-kuma:1...
Error: initializing source docker://registry.access.redhat.com/louislam/uptime-kuma:1: reading manifest 1 in registry.access.redhat.com/louislam/uptime-kuma: name unknown: Repo not found
✔ registry.centos.org/louislam/uptime-kuma:1
Trying to pull registry.centos.org/louislam/uptime-kuma:1...
Error: initializing source docker://registry.centos.org/louislam/uptime-kuma:1: reading manifest 1 in registry.centos.org/louislam/uptime-kuma: manifest unknown: manifest unknown
✔ docker.io/louislam/uptime-kuma:1
Trying to pull docker.io/louislam/uptime-kuma:1...
Getting image source signatures
Copying blob 59583c507ad2 done
Copying blob c56d959776a3 done
Copying blob 15115158dd02 done
Copying blob 0a3670bd8e93 done
Copying blob 579e31ff2961 done
Copying blob 7581f704a9fb done
Copying blob cda0f3030bcb done
Copying blob bfd44b4f1180 done
Copying config d25e979aca done
Writing manifest to image destination
Storing signatures
a2bb93273f2035dfd513abf3fa0d9bfd38b7cc1cebd194e742bfceb01adf9aad

然后使用docker-compose进行部署,或者docker run -d --restart=always -p 3001:3001 -v uptime-kuma:/app/data --name uptime-kuma louislam/uptime-kuma:1

1
2
3
4
5
6
7
8
9
10
11
12
13
14
15
16
17
18
19
20
[root@cn-py-dl-r8 docker]# cd /root/uptime-kuma/docker
[root@cn-py-dl-r8 docker]# cat docker-compose.yml
# Simple docker-composer.yml
# You can change your port or volume location

version: '3.3'

services:
uptime-kuma:
image: louislam/uptime-kuma
container_name: uptime-kuma
volumes:
- uptime-kuma:/app/data
ports:
- 3001:3001

volumes:
uptime-kuma:
[root@cn-py-dl-r8 docker]# docker-compose up -d
Creating uptime-kuma ... done

最后防火墙放通端口,可参照红帽官方文档:使用 CLI 控制端口

1
2
3
4
5
6
7
8
9
10
11
12
13
14
15
16
17
18
19
20
21
22
23
24
[root@cn-py-dl-r8 ~]# systemctl status firewalld
● firewalld.service - firewalld - dynamic firewall daemon
Loaded: loaded (/usr/lib/systemd/system/firewalld.service; enabled; vendor preset: enabled)
Active: active (running) since Sun 2022-03-27 14:59:55 CST; 5 days ago
Docs: man:firewalld(1)
Main PID: 1107 (firewalld)
Tasks: 2 (limit: 100784)
Memory: 33.7M
CGroup: /system.slice/firewalld.service
└─1107 /usr/libexec/platform-python -s /usr/sbin/firewalld --nofork --nopid

Mar 27 14:59:54 cn-py-dl-r8 systemd[1]: Starting firewalld - dynamic firewall daemon...
Mar 27 14:59:55 cn-py-dl-r8 systemd[1]: Started firewalld - dynamic firewall daemon.
Mar 27 14:59:56 cn-py-dl-r8 firewalld[1107]: WARNING: AllowZoneDrifting is enabled. This is considered >
[root@cn-py-dl-r8 ~]# firewall-cmd --list-services
cockpit dhcpv6-client ssh
[root@cn-py-dl-r8 ~]# firewall-cmd --list-ports

[root@cn-py-dl-r8 ~]# firewall-cmd --add-port=3001/tcp
success
[root@cn-py-dl-r8 ~]# firewall-cmd --list-ports
3001/tcp
[root@cn-py-dl-r8 ~]# firewall-cmd --runtime-to-permanent
success

0x07.安装SmokePing

1
2
3
4
5
6
7
8
9
10
11
12
13
14
15
16
17
18
19
20
21
22
23
24
25
[root@cn-py-dl-r8 ~]# git clone https://github.com/linuxserver/docker-smokeping
[root@cn-py-dl-r8 ~]# cd docker-smokeping/
[root@cn-py-dl-r8 docker-smokeping]# mkdir config data
[root@cn-py-dl-r8 docker-smokeping]# cat docker-compose.yml
---
version: "2.1"
services:
smokeping:
image: lscr.io/linuxserver/smokeping
container_name: smokeping
environment:
- PUID=1000
- PGID=1000
- TZ=Europe/London
volumes:
- /root/docker-smokeping/config:/config
- /root/docker-smokepingdata:/data
ports:
- 81:80
restart: unless-stopped
[root@cn-py-dl-r8 docker-smokeping]# podman system service -t 0 &
[1] 2547
[root@cn-py-dl-r8 docker-smokeping]# docker-compose up -d
Creating network "docker-smokeping_default" with the default driver
Creating smokeping ... done

然后去日志里一看,全是报错草……在切换了SELINUX模式之后不再报错了,这就对了嘛

1
2
ERROR: can't open /config/General: No such file or directory
httpd: Could not open configuration file /etc/apache2/httpd.conf: No such file or directory

0x08.安装x-ui

1
2
3
[root@cn-py-dl-r8 ~]# git clone https://github.com/vaxilu/x-ui.git
[root@cn-py-dl-r8 ~]# cd x-ui/
[root@cn-py-dl-r8 x-ui]# ./install.sh

代理有点问题所以手动修改脚本内容

  1. wget -N --no-check-certificate -O /usr/local/x-ui-linux-${arch}.tar.gz https://github.com/vaxilu/x-ui/releases/download/${last_version}/x-ui-linux-${arch}.tar.gz修改为
    wget -N --no-check-certificate -O /usr/local/x-ui-linux-${arch}.tar.gz https://proxy-cf.yuangezhizao.cn/dl/x-ui-linux-amd64.tar.gz
  2. wget --no-check-certificate -O /usr/bin/x-ui https://raw.githubusercontent.com/vaxilu/x-ui/main/x-ui.sh修改为mv /root/x-ui/x-ui.sh /usr/bin/x-ui
1
2
3
4
[root@cn-py-dl-r8 x-ui]# firewall-cmd --add-port=54321/tcp
success
[root@cn-py-dl-r8 x-ui]# firewall-cmd --runtime-to-permanent
success

0x09.安装SmartDNS

安装

1
2
3
4
5
6
7
8
9
10
11
12
13
14
15
16
17
18
19
20
21
22
23
24
25
26
27
28
29
30
31
32
33
34
35
[root@cn-py-dl-r8 ~]# export HTTP_PROXY=http://192.168.25.248:1081
[root@cn-py-dl-r8 ~]# export HTTPS_PROXY=http://192.168.25.248:1081
[root@CentOS dl]# wget https://github.com/pymumu/smartdns/releases/download/Release36.1/smartdns.1.2022.04.05-2046.x86_64-linux-all.tar.gz
[root@cn-py-dl-r8 ~]# wget https://proxy-cf.yuangezhizao.cn/dl/smartdns.1.2022.04.05-2046.x86_64-linux-all.tar.gz
[root@cn-py-dl-r8 ~]# tar zxf smartdns.1.2022.04.05-2046.x86_64-linux-all.tar.gz
[root@cn-py-dl-r8 ~]# cd smartdns/
[root@cn-py-dl-r8 smartdns]# ls
etc install LICENSE package ReadMe_en.md ReadMe.md systemd usr
[root@cn-py-dl-r8 smartdns]# ./install -i
install: creating directory '/etc/smartdns'
'usr/sbin/smartdns' -> '/usr/sbin/smartdns'
'etc/smartdns/smartdns.conf' -> '/etc/smartdns/smartdns.conf'
'etc/default/smartdns' -> '/etc/default/smartdns'
'etc/init.d/smartdns' -> '/etc/init.d/smartdns'
'systemd/smartdns.service' -> '/usr/lib/systemd/system/smartdns.service'
Synchronizing state of smartdns.service with SysV service script with /usr/lib/systemd/systemd-sysv-install.
Executing: /usr/lib/systemd/systemd-sysv-install enable smartdns
Created symlink /etc/systemd/system/smartdns.service → /usr/lib/systemd/system/smartdns.service.
Created symlink /etc/systemd/system/multi-user.target.wants/smartdns.service → /usr/lib/systemd/system/smartdns.service.
[root@cn-py-dl-r8 smartdns]# cp /etc/smartdns/smartdns.conf /etc/smartdns/smartdns.conf.bak
[root@cn-py-dl-r8 smartdns]# mkdir /var/log/smartdns
[root@cn-py-dl-r8 smartdns]# systemctl start smartdns --now
[root@cn-py-dl-r8 smartdns]# systemctl status smartdns
● smartdns.service - SmartDNS Server
Loaded: loaded (/usr/lib/systemd/system/smartdns.service; enabled; vendor preset: disabled)
Active: active (running) since Sat 2022-04-23 15:42:58 CST; 13s ago
Process: 475673 ExecStart=/usr/sbin/smartdns -p /var/run/smartdns.pid $SMART_DNS_OPTS (code=ex>
Main PID: 475675 (smartdns)
Tasks: 4 (limit: 100784)
Memory: 696.0K
CGroup: /system.slice/smartdns.service
└─475675 /usr/sbin/smartdns -p /var/run/smartdns.pid

Apr 23 15:42:58 cn-py-dl-r8 systemd[1]: Starting SmartDNS Server...
Apr 23 15:42:58 cn-py-dl-r8 systemd[1]: Started SmartDNS Server.

结果发现53端口被占用,需要killdnsmasq的进程

1
2
3
4
5
6
7
8
9
[root@cn-py-dl-r8 smartdns]# lsof -i:53
COMMAND PID USER FD TYPE DEVICE SIZE/OFF NODE NAME
dnsmasq 1947 dnsmasq 5u IPv4 39043 0t0 UDP cn-py-dl-r8:domain
dnsmasq 1947 dnsmasq 6u IPv4 39044 0t0 TCP cn-py-dl-r8:domain (LISTEN)
[root@cn-py-dl-r8 smartdns]# systemctl status dnsmasq
● dnsmasq.service - DNS caching server.
Loaded: loaded (/usr/lib/systemd/system/dnsmasq.service; disabled; vendor preset: disabled)
Active: inactive (dead)
[root@cn-py-dl-r8 smartdns]# kill -9 1947

配置文件

点击此处 ← 查看折叠
1
2
3
4
5
6
7
8
9
10
11
12
13
14
15
16
17
18
19
20
21
22
23
24
25
26
27
28
29
30
31
32
33
34
35
36
37
38
39
40
41
42
43
44
45
46
47
48
49
50
51
52
53
54
55
56
57
58
59
60
61
62
63
64
65
66
67
68
69
70
71
72
73
74
75
76
77
78
79
80
81
82
83
84
85
86
87
88
89
90
91
92
93
94
95
96
97
98
99
100
101
102
103
104
105
106
107
108
109
110
111
112
113
114
115
116
117
118
119
120
121
122
123
124
125
126
127
128
129
130
131
132
133
134
135
136
137
138
139
140
141
142
143
144
145
146
147
148
149
150
151
152
153
154
155
156
157
158
159
160
161
162
163
164
165
166
167
168
169
170
171
172
173
174
175
176
177
178
179
180
181
182
183
184
185
186
187
188
189
190
191
192
193
194
195
196
197
198
199
200
201
202
203
204
205
206
207
208
209
210
211
212
213
214
215
216
217
218
219
220
221
222
223
224
225
226
227
[root@cn-py-dl-r8 ~]# cat /etc/smartdns/smartdns.conf
# dns server name, default is host name
# server-name,
# example:
# server-name smartdns
#

# Include another configuration options
# conf-file [file]
# conf-file blacklist-ip.conf

# dns server bind ip and port, default dns server port is 53, support binding multi ip and port
# bind udp server
# bind [IP]:[port] [-group [group]] [-no-rule-addr] [-no-rule-nameserver] [-no-rule-ipset] [-no-speed-check] [-no-cache] [-no-rule-soa] [-no-dualstack-selection]
# bind tcp server
# bind-tcp [IP]:[port] [-group [group]] [-no-rule-addr] [-no-rule-nameserver] [-no-rule-ipset] [-no-speed-check] [-no-cache] [-no-rule-soa] [-no-dualstack-selection]
# option:
# -group: set domain request to use the appropriate server group.
# -no-rule-addr: skip address rule.
# -no-rule-nameserver: skip nameserver rule.
# -no-rule-ipset: skip ipset rule.
# -no-speed-check: do not check speed.
# -no-cache: skip cache.
# -no-rule-soa: Skip address SOA(#) rules.
# -no-dualstack-selection: Disable dualstack ip selection.
# -force-aaaa-soa: force AAAA query return SOA.
# example:
# IPV4:
# bind :53
# bind :6053 -group office -no-speed-check
# IPV6:
# bind [::]:53
# bind-tcp [::]:53
bind [::]:53

# tcp connection idle timeout
# tcp-idle-time [second]

# dns cache size
# cache-size [number]
# 0: for no cache
cache-size 4096

# enable persist cache when restart
# cache-persist yes

# cache persist file
# cache-file /tmp/smartdns.cache

# prefetch domain
# prefetch-domain [yes|no]
prefetch-domain yes

# cache serve expired
# serve-expired [yes|no]
# serve-expired yes

# cache serve expired TTL
# serve-expired-ttl [num]
# serve-expired-ttl 0

# reply TTL value to use when replying with expired data
# serve-expired-reply-ttl [num]
# serve-expired-reply-ttl 30

# List of hosts that supply bogus NX domain results
# bogus-nxdomain [ip/subnet]

# List of IPs that will be filtered when nameserver is configured -blacklist-ip parameter
# blacklist-ip [ip/subnet]

# List of IPs that will be accepted when nameserver is configured -whitelist-ip parameter
# whitelist-ip [ip/subnet]

# List of IPs that will be ignored
# ignore-ip [ip/subnet]

# speed check mode
# speed-check-mode [ping|tcp:port|none|,]
# example:
speed-check-mode ping,tcp:80,tcp:443
# speed-check-mode tcp:443,ping
# speed-check-mode none

# force AAAA query return SOA
# force-AAAA-SOA [yes|no]

# force specific qtype return soa
# force-qtype-SOA [qtypeid |...]
# force-qtype-SOA 65 28

# Enable IPV4, IPV6 dual stack IP optimization selection strategy
# dualstack-ip-selection-threshold [num] (0~1000)
# dualstack-ip-selection [yes|no]
dualstack-ip-selection yes

# edns client subnet
# edns-client-subnet [ip/subnet]
# edns-client-subnet 192.168.1.1/24
# edns-client-subnet [8::8]/56

# ttl for all resource record
# rr-ttl: ttl for all record
# rr-ttl-min: minimum ttl for resource record
# rr-ttl-max: maximum ttl for resource record
# example:
# rr-ttl 300
# rr-ttl-min 60
# rr-ttl-max 86400

# set log level
# log-level: [level], level=fatal, error, warn, notice, info, debug
# log-file: file path of log file.
# log-size: size of each log file, support k,m,g
# log-num: number of logs
log-level info
log-file /var/log/smartdns/smartdns.log
log-size 100m
log-num 90

# dns audit
# audit-enable [yes|no]: enable or disable audit.
audit-enable yes
# audit-SOA [yes|no]: enable or disable log soa result.
# audit-size size of each audit file, support k,m,g
audit-file /var/log/smartdns/smartdns-audit.log
audit-size 100m
audit-num 90

# certificate file
# ca-file [file]
# ca-file /etc/ssl/certs/ca-certificates.crt

# certificate path
# ca-path [path]
# ca-path /etc/ss/certs

# remote udp dns server list
# server [IP]:[PORT] [-blacklist-ip] [-whitelist-ip] [-check-edns] [-group [group] ...] [-exclude-default-group]
# default port is 53
# -blacklist-ip: filter result with blacklist ip
# -whitelist-ip: filter result whth whitelist ip, result in whitelist-ip will be accepted.
# -check-edns: result must exist edns RR, or discard result.
# -group [group]: set server to group, use with nameserver /domain/group.
# -exclude-default-group: exclude this server from default group.
# server 8.8.8.8 -blacklist-ip -check-edns -group g1 -group g2
# server 114.114.114.114
server 172.64.36.1
server 172.64.36.2
server 1.1.1.1
server 8.8.8.8
server 219.149.6.99
server 120.53.53.11
server 121.4.4.176
server 94.140.14.140
server 94.140.14.141

server 2a06:98c1:54::1802
server 240c::6666
server 240e:41:c900:ffff::
server 2402:4e00:0::d2ad:6392
server 2402:4e00:1::d2ad:6392
server 2a10:50c0::1:ff
server 2a10:50c0::2:ff
# remote tcp dns server list
# server-tcp [IP]:[PORT] [-blacklist-ip] [-whitelist-ip] [-group [group] ...] [-exclude-default-group]
# default port is 53
# server-tcp 8.8.8.8

# remote tls dns server list
# server-tls [IP]:[PORT] [-blacklist-ip] [-whitelist-ip] [-spki-pin [sha256-pin]] [-group [group] ...] [-exclude-default-group]
# -spki-pin: TLS spki pin to verify.
# -tls-host-verify: cert hostname to verify.
# -host-name: TLS sni hostname.
# -no-check-certificate: no check certificate.
# Get SPKI with this command:
# echo | openssl s_client -connect '[ip]:853' | openssl x509 -pubkey -noout | openssl pkey -pubin -outform der | openssl dgst -sha256 -binary | openssl enc -base64
# default port is 853
# server-tls 8.8.8.8
# server-tls 1.0.0.1
server-tls dot-d2ad6392.dot.pub
server-tls dns-unfiltered.adguard.com

# remote https dns server list
# server-https https://[host]:[port]/path [-blacklist-ip] [-whitelist-ip] [-spki-pin [sha256-pin]] [-group [group] ...] [-exclude-default-group]
# -spki-pin: TLS spki pin to verify.
# -tls-host-verify: cert hostname to verify.
# -host-name: TLS sni hostname.
# -http-host: http host.
# -no-check-certificate: no check certificate.
# default port is 443
# server-https https://cloudflare-dns.com/dns-query
server-https https://9u12dgz3lz.cloudflare-gateway.com/dns-query
server-https https://cloudflare-dns.com/dns-query
server-https https://dns.google/dns-query
server-https https://doh-d2ad6392-smartdns.doh.pub/dns-query
server-https https://dns-unfiltered.adguard.com/dns-query

# specific nameserver to domain
# nameserver /domain/[group|-]
# nameserver /www.example.com/office, Set the domain name to use the appropriate server group.
# nameserver /www.example.com/-, ignore this domain

# specific address to domain
# address /domain/[ip|-|-4|-6|#|#4|#6]
# address /www.example.com/1.2.3.4, return ip 1.2.3.4 to client
# address /www.example.com/-, ignore address, query from upstream, suffix 4, for ipv4, 6 for ipv6, none for all
# address /www.example.com/#, return SOA to client, suffix 4, for ipv4, 6 for ipv6, none for all

# enable ipset timeout by ttl feature
# ipset-timeout [yes]

# specific ipset to domain
# ipset /domain/[ipset|-]
# ipset /www.example.com/block, set ipset with ipset name of block
# ipset /www.example.com/-, ignore this domain

# set domain rules
# domain-rules /domain/ [-speed-check-mode [...]]
# rules:
# [-c] -speed-check-mode [mode]: speed check mode
# speed-check-mode [ping|tcp:port|none|,]
# [-a] -address [address|-]: same as address option
# [-n] -nameserver [group|-]: same as nameserver option
# [-p] -ipset [ipset|-]: same as ipset option
# [-d] -dualstack-ip-selection [yes|no]: same as dualstack-ip-selection option
[root@cn-py-dl-r8 ~]#

0x10.后记

唉,cn-py-dl-c8全部木大,cn-py-dl-r8又得个把月才能再搞起来,心累……

0x11.引用

Centos8安装podman容器+portainerUI+podman API启用方法