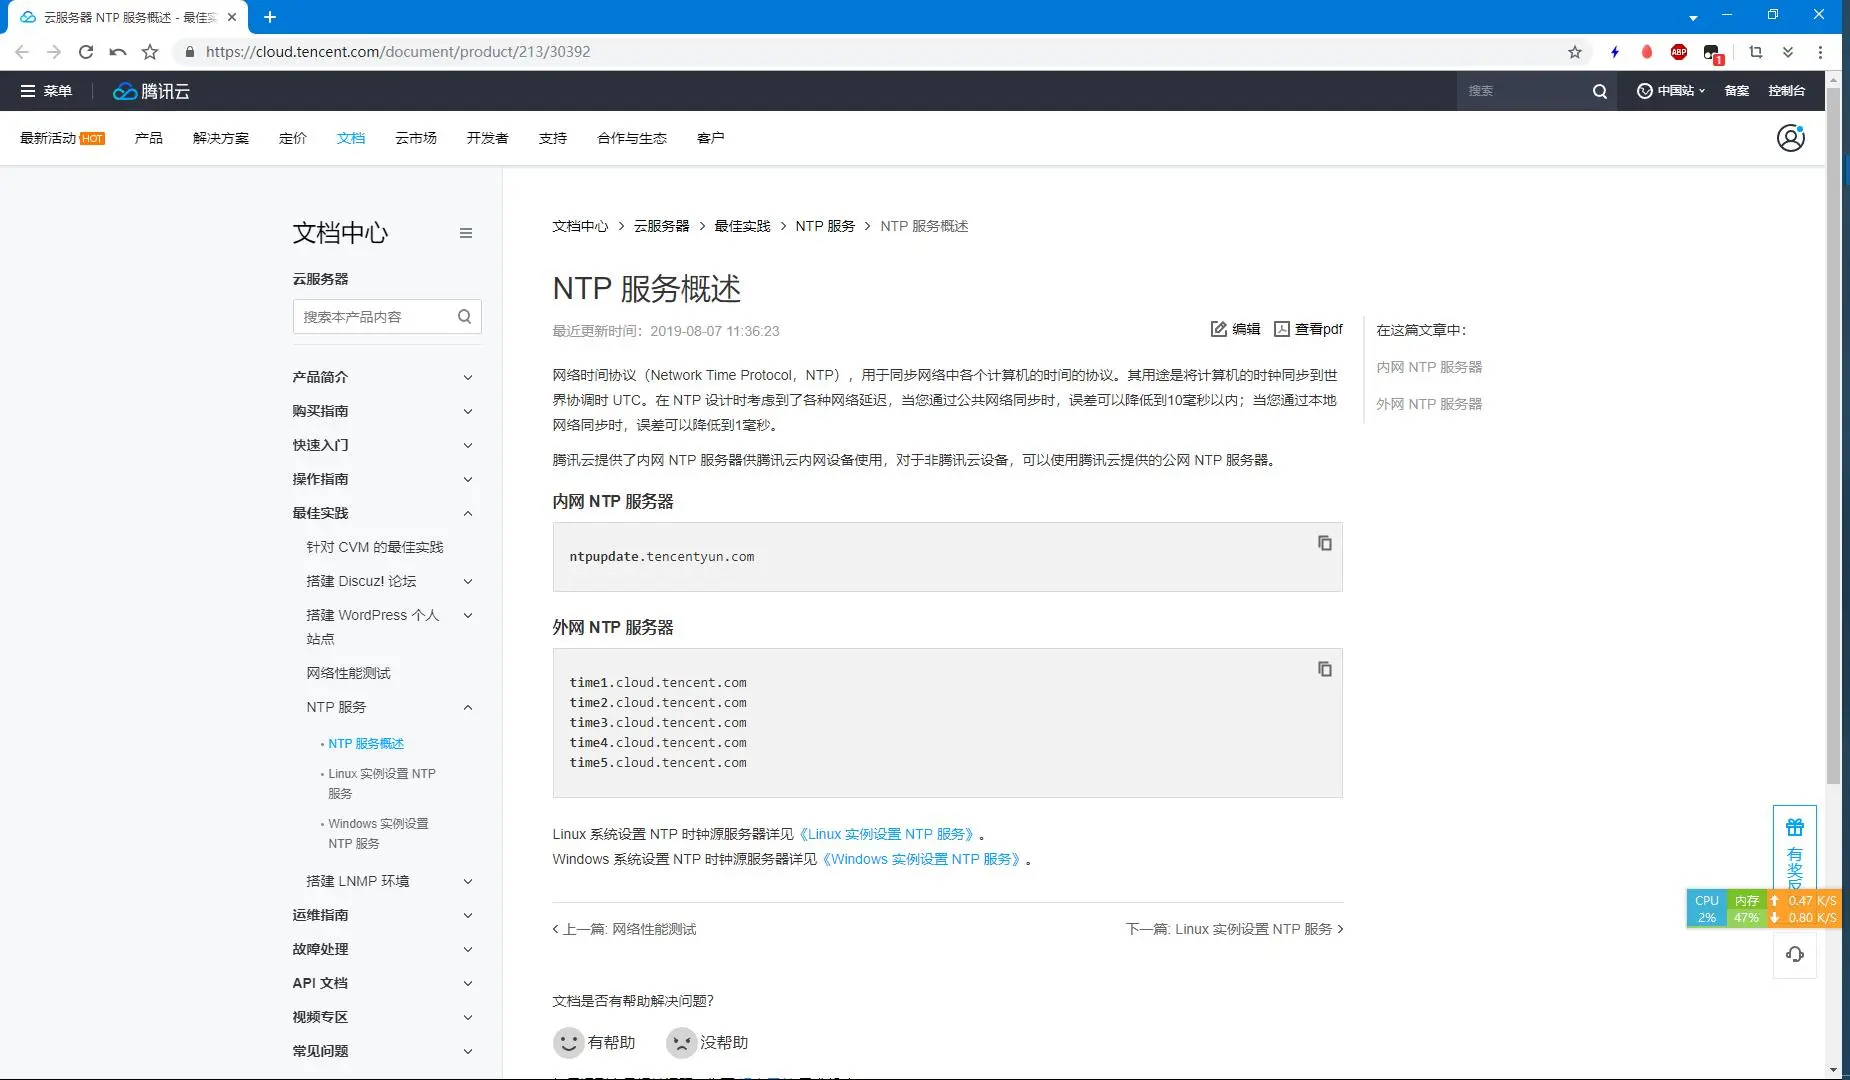
网络时间协议(Network Time Protocol,NTP),用于同步网络中各个计算机的时间的协议。其用途是将计算机的时钟同步到世界协调时UTC。在NTP设计时考虑到了各种网络延迟,当您通过公共网络同步时,误差可以降低到10毫秒以内;当您通过本地网络同步时,误差可以降低到1毫秒 腾讯云提供了内网NTP服务器供腾讯云内网设备使用,对于非腾讯云设备,可以使用腾讯云提供的公网NTP服务器
NTPD(Network Time Protocol daemon)是Linux操作系统的一个守护进程,用于校正本地系统与时钟源服务器之前的时间,完整的实现了NTP协议。NTPD与NTPDate的区别是NTPD是步进式的逐渐校正时间,不会出现时间跳变,而NTPDate是断点更新
公网好评
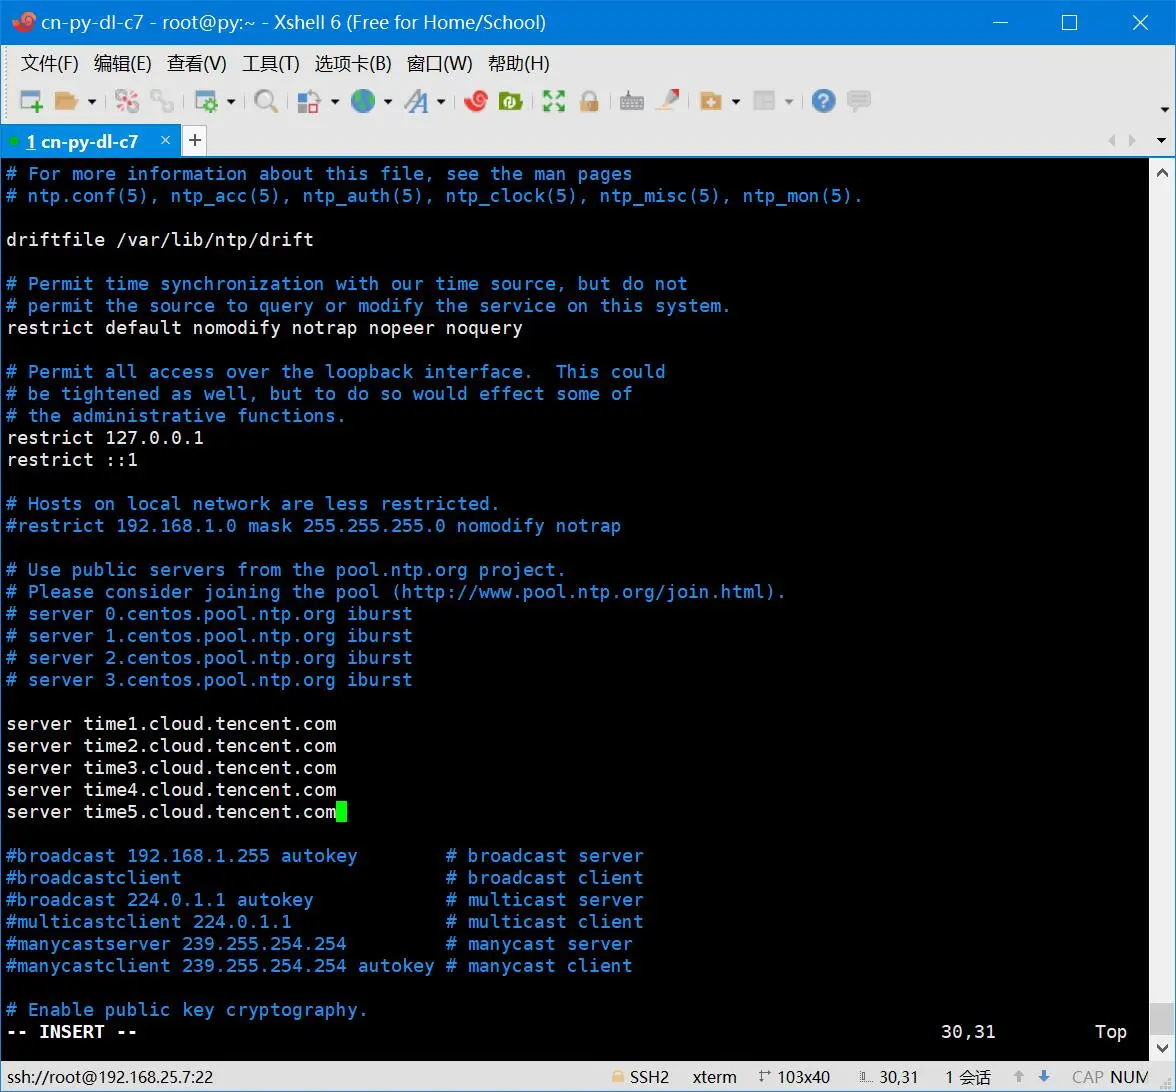
安装NTPD yum -y install ntp 配置NTP vim /etc/ntp.conf
1 2 3 4 5 6 7 8 9 10 11
# Use public servers from the pool.ntp.org project. # Please consider joining the pool (http://www.pool.ntp.org/join.html). # server 0.centos.pool.ntp.org iburst # server 1.centos.pool.ntp.org iburst # server 2.centos.pool.ntp.org iburst # server 3.centos.pool.ntp.org iburst server time1.cloud.tencent.com server time2.cloud.tencent.com server time3.cloud.tencent.com server time4.cloud.tencent.com server time5.cloud.tencent.com
修改
运行NTPD并自启
1 2 3 4 5 6 7
[root@py ~]# rpm -qa | grep ntp ntpdate-4.2.6p5-29.el7.centos.x86_64 ntp-4.2.6p5-29.el7.centos.x86_64 fontpackages-filesystem-1.44-8.el7.noarch [root@py ~]# systemctl restart ntpd.service [root@py ~]# systemctl enable ntpd.service Created symlink from /etc/systemd/system/multi-user.target.wants/ntpd.service to /usr/lib/systemd/system/ntpd.service.
[root@py ~]# service ntpd status Redirecting to /bin/systemctl status ntpd.service ● ntpd.service - Network Time Service Loaded: loaded (/usr/lib/systemd/system/ntpd.service; enabled; vendor preset: disabled) Active: active (running) since Sat 2020-04-04 18:29:35 CST; 1min 39s ago Main PID: 9836 (ntpd) CGroup: /system.slice/ntpd.service ├─9836 /usr/sbin/ntpd -u ntp:ntp -g └─9837 /usr/sbin/ntpd -u ntp:ntp -g
Apr 04 18:29:37 py.yuangezhizao.cn ntpd_intres[9837]: host name not found: time1.cloud.tencent.com Apr 04 18:29:37 py.yuangezhizao.cn ntpd_intres[9837]: host name not found: time2.cloud.tencent.com Apr 04 18:29:37 py.yuangezhizao.cn ntpd_intres[9837]: host name not found: time3.cloud.tencent.com Apr 04 18:29:37 py.yuangezhizao.cn ntpd_intres[9837]: host name not found: time4.cloud.tencent.com Apr 04 18:29:37 py.yuangezhizao.cn ntpd_intres[9837]: host name not found: time5.cloud.tencent.com Apr 04 18:30:40 py.yuangezhizao.cn ntpd_intres[9837]: host name not found: time1.cloud.tencent.com Apr 04 18:30:40 py.yuangezhizao.cn ntpd_intres[9837]: host name not found: time2.cloud.tencent.com Apr 04 18:30:40 py.yuangezhizao.cn ntpd_intres[9837]: host name not found: time3.cloud.tencent.com Apr 04 18:30:40 py.yuangezhizao.cn ntpd_intres[9837]: host name not found: time4.cloud.tencent.com Apr 04 18:30:40 py.yuangezhizao.cn ntpd_intres[9837]: host name not found: time5.cloud.tencent.com
[root@py ~]# service ntpd status Redirecting to /bin/systemctl status ntpd.service ● ntpd.service - Network Time Service Loaded: loaded (/usr/lib/systemd/system/ntpd.service; enabled; vendor preset: disabled) Active: active (running) since Sat 2020-04-04 18:34:09 CST; 11s ago Process: 9981 ExecStart=/usr/sbin/ntpd -u ntp:ntp $OPTIONS (code=exited, status=0/SUCCESS) Main PID: 9982 (ntpd) CGroup: /system.slice/ntpd.service └─9982 /usr/sbin/ntpd -u ntp:ntp -g
Apr 04 18:34:09 py.yuangezhizao.cn ntpd[9982]: Listen normally on 2 lo 127.0.0.1 UDP 123 Apr 04 18:34:09 py.yuangezhizao.cn ntpd[9982]: Listen normally on 3 ens192 192.168.25.7 UDP 123 Apr 04 18:34:09 py.yuangezhizao.cn ntpd[9982]: Listen normally on 4 lo ::1 UDP 123 Apr 04 18:34:09 py.yuangezhizao.cn ntpd[9982]: Listen normally on 5 ens192 240e:<rm>:f89...123 Apr 04 18:34:09 py.yuangezhizao.cn ntpd[9982]: Listen normally on 6 ens192 240e:<rm>:caa...123 Apr 04 18:34:09 py.yuangezhizao.cn ntpd[9982]: Listen normally on 7 ens192 fe80::<rm>:f...123 Apr 04 18:34:09 py.yuangezhizao.cn ntpd[9982]: Listening on routing socket on fd #24 for interfac...tes Apr 04 18:34:09 py.yuangezhizao.cn ntpd[9982]: 0.0.0.0 c016 06 restart Apr 04 18:34:09 py.yuangezhizao.cn ntpd[9982]: 0.0.0.0 c012 02 freq_set kernel 0.000 PPM Apr 04 18:34:09 py.yuangezhizao.cn ntpd[9982]: 0.0.0.0 c011 01 freq_not_set Hint: Some lines were ellipsized, use -l to show in full.
[root@py ~]# ntpstat unsynchronised time server re-starting polling server every 8 s
获取更详细的NTP服务信息
1 2 3 4 5 6 7 8
[root@py ~]# ntpq -p remote refid st t when poll reach delay offset jitter ============================================================================== 139.199.215.251 100.122.36.4 2 u 32 64 1 57.452 -1.940 0.000 111.230.189.174 100.122.36.196 2 u 32 64 1 59.803 -1.716 0.000 139.199.214.202 100.122.36.4 2 u 31 64 1 57.946 0.590 0.000 134.175.254.134 100.122.36.4 2 u 31 64 1 57.897 -2.392 0.000 134.175.253.104 100.122.36.4 2 u 32 64 1 59.239 -0.167 0.000
过了一会儿重新来看
1 2 3 4 5 6 7 8 9 10 11 12
[root@py ~]# ntpstat synchronised to NTP server (134.175.254.134) at stratum 3 time correct to within 45 ms polling server every 64 s [root@py ~]# ntpq -p remote refid st t when poll reach delay offset jitter ============================================================================== +139.199.215.251 100.122.36.196 2 u 71 128 377 56.945 -1.334 0.556 *111.230.189.174 100.122.36.196 2 u 53 128 377 59.046 1.035 1.348 -139.199.214.202 100.122.36.4 2 u 52 128 377 57.424 3.607 0.707 -134.175.254.134 100.122.36.196 2 u 193 128 376 57.452 2.038 0.768 +134.175.253.104 100.122.36.196 2 u 126 128 377 58.659 -0.204 0.623
然后顺便去看了眼txy机子
1
2
3
4
[root@txy bt]# ntpq -p
     remote           refid      st t when poll reach   delay   offset  jitter
==============================================================================
*10.237.208.123  100.122.36.196   2 u  861 1024  377   32.771    0.215   0.555
[root@py vmware-tools-distrib]# ./vmware-install.pl open-vm-tools packages are available from the OS vendor and VMware recommends using open-vm-tools packages. See http://kb.vmware.com/kb/2073803 for more information. Do you still want to proceed with this installation? [yes]
INPUT: [yes] default
A previous installation of VMware Tools has been detected.
The previous installation was made by the tar installer (version 4).
Keeping the tar4 installer database format.
You have a version of VMware Tools installed. Continuing this install will first uninstall the currently installed version. Do you wish to continue? (yes/no) [yes]
INPUT: [yes] default
Uninstalling the tar installation of VMware Tools.
manageSELinux uninstall: The 'semanage' utility was not found. There was an error configuring the SELinux security context for VMware Tools. Please make certain that SELinux is configured correctly.
Stopping services for VMware Tools
Stopping vmware-tools (via systemctl): [ OK ]
cat: /tmp/_cafenv-appconfig_: No such file or directory This program previously created the directory /etc/vmware-caf/pme/config, and was about to remove it. Since there are files in that directory that this program did not create, it will not be removed.
This program previously created the directory /etc/vmware-caf/pme, and was about to remove it. Since there are files in that directory that this program did not create, it will not be removed.
This program previously created the directory /etc/vmware-caf, and was about to remove it. Since there are files in that directory that this program did not create, it will not be removed.
The removal of VMware Tools 10.3.21 build-14772444 for Linux completed successfully.
Installing VMware Tools.
In which directory do you want to install the binary files? [/usr/bin]
INPUT: [/usr/bin] default
What is the directory that contains the init directories (rc0.d/ to rc6.d/)? [/etc/rc.d]
INPUT: [/etc/rc.d] default
What is the directory that contains the init scripts? [/etc/rc.d/init.d]
INPUT: [/etc/rc.d/init.d] default
In which directory do you want to install the daemon files? [/usr/sbin]
INPUT: [/usr/sbin] default
In which directory do you want to install the library files? [/usr/lib/vmware-tools]
INPUT: [/usr/lib/vmware-tools] default
The path "/usr/lib/vmware-tools" does not exist currently. This program is going to create it, including needed parent directories. Is this what you want? [yes]
INPUT: [yes] default
In which directory do you want to install the common agent library files? [/usr/lib]
INPUT: [/usr/lib] default
In which directory do you want to install the common agent transient files? [/var/lib]
INPUT: [/var/lib] default
In which directory do you want to install the documentation files? [/usr/share/doc/vmware-tools]
INPUT: [/usr/share/doc/vmware-tools] default
The path "/usr/share/doc/vmware-tools" does not exist currently. This program is going to create it, including needed parent directories. Is this what you want? [yes]
INPUT: [yes] default
The installation of VMware Tools 10.3.21 build-14772444 for Linux completed successfully. You can decide to remove this software from your system at any time by invoking the following command: "/usr/bin/vmware-uninstall-tools.pl".
Before running VMware Tools for the first time, you need to configure it by invoking the following command: "/usr/bin/vmware-config-tools.pl". Do you want this program to invoke the commandfor you now? [yes]
INPUT: [yes] default
Initializing...
Making sure services for VMware Tools are stopped.
Stopping vmware-tools (via systemctl): [ OK ]
The module vmci has already been installed on this system by another installer or package and will not be modified by this installer.
The module vsock has already been installed on this system by another installer or package and will not be modified by this installer.
The module vmxnet3 has already been installed on this system by another installer or package and will not be modified by this installer.
The module pvscsi has already been installed on this system by another installer or package and will not be modified by this installer.
The module vmmemctl has already been installed on this system by another installer or package and will not be modified by this installer.
The VMware Host-Guest Filesystem allows for shared folders between the host OS and the guest OS in a Fusion or Workstation virtual environment. Do you wish to enable this feature? [yes]
INPUT: [yes] default
Before you can compile modules, you need to have the following installed...
make gcc kernel headers of the running kernel
Searching for GCC... Detected GCC binary at "/bin/gcc". The path "/bin/gcc" appears to be a valid path to the gcc binary. Would you like to change it? [no]
INPUT: [no] default
Searching for a valid kernel header path... Detected the kernel headers at "/lib/modules/3.10.0-1062.18.1.el7.x86_64/build/include". The path "/lib/modules/3.10.0-1062.18.1.el7.x86_64/build/include" appears to be a valid path to the 3.10.0-1062.18.1.el7.x86_64 kernel headers. Would you like to change it? [no]
INPUT: [no] default
Using kernel build system. make: Entering directory `/tmp/modconfig-xU5hFj/vmhgfs-only' /bin/make -C /lib/modules/3.10.0-1062.18.1.el7.x86_64/build/include/.. SUBDIRS=$PWD SRCROOT=$PWD/. \ MODULEBUILDDIR= modules make[1]: Entering directory `/usr/src/kernels/3.10.0-1062.18.1.el7.x86_64' CC [M] /tmp/modconfig-xU5hFj/vmhgfs-only/backdoorGcc64.o CC [M] /tmp/modconfig-xU5hFj/vmhgfs-only/message.o CC [M] /tmp/modconfig-xU5hFj/vmhgfs-only/dir.o CC [M] /tmp/modconfig-xU5hFj/vmhgfs-only/request.o /tmp/modconfig-xU5hFj/vmhgfs-only/backdoorGcc64.o: warning: objtool: BackdoorHbIn()+0xd: duplicate frame pointer save /tmp/modconfig-xU5hFj/vmhgfs-only/backdoorGcc64.o: warning: objtool: BackdoorHbOut()+0xd: duplicate frame pointer save CC [M] /tmp/modconfig-xU5hFj/vmhgfs-only/filesystem.o CC [M] /tmp/modconfig-xU5hFj/vmhgfs-only/cpName.o CC [M] /tmp/modconfig-xU5hFj/vmhgfs-only/rpcout.o CC [M] /tmp/modconfig-xU5hFj/vmhgfs-only/stubs.o CC [M] /tmp/modconfig-xU5hFj/vmhgfs-only/hgfsUtil.o CC [M] /tmp/modconfig-xU5hFj/vmhgfs-only/hgfsEscape.o CC [M] /tmp/modconfig-xU5hFj/vmhgfs-only/link.o CC [M] /tmp/modconfig-xU5hFj/vmhgfs-only/transport.o CC [M] /tmp/modconfig-xU5hFj/vmhgfs-only/module.o CC [M] /tmp/modconfig-xU5hFj/vmhgfs-only/file.o CC [M] /tmp/modconfig-xU5hFj/vmhgfs-only/super.o CC [M] /tmp/modconfig-xU5hFj/vmhgfs-only/bdhandler.o CC [M] /tmp/modconfig-xU5hFj/vmhgfs-only/fsutil.o CC [M] /tmp/modconfig-xU5hFj/vmhgfs-only/cpNameLinux.o CC [M] /tmp/modconfig-xU5hFj/vmhgfs-only/hgfsBd.o CC [M] /tmp/modconfig-xU5hFj/vmhgfs-only/page.o CC [M] /tmp/modconfig-xU5hFj/vmhgfs-only/backdoor.o CC [M] /tmp/modconfig-xU5hFj/vmhgfs-only/inode.o CC [M] /tmp/modconfig-xU5hFj/vmhgfs-only/dentry.o CC [M] /tmp/modconfig-xU5hFj/vmhgfs-only/cpNameLite.o CC [M] /tmp/modconfig-xU5hFj/vmhgfs-only/kernelStubsLinux.o LD [M] /tmp/modconfig-xU5hFj/vmhgfs-only/vmhgfs.o Building modules, stage 2. MODPOST 1 modules CC /tmp/modconfig-xU5hFj/vmhgfs-only/vmhgfs.mod.o LD [M] /tmp/modconfig-xU5hFj/vmhgfs-only/vmhgfs.ko make[1]: Leaving directory `/usr/src/kernels/3.10.0-1062.18.1.el7.x86_64' /bin/make -C $PWD SRCROOT=$PWD/. \ MODULEBUILDDIR= postbuild make[1]: Entering directory `/tmp/modconfig-xU5hFj/vmhgfs-only' make[1]: `postbuild' is up to date. make[1]: Leaving directory `/tmp/modconfig-xU5hFj/vmhgfs-only' cp -f vmhgfs.ko ./../vmhgfs.o make: Leaving directory `/tmp/modconfig-xU5hFj/vmhgfs-only' The vmxnet driver is no longer supported on kernels 3.3 and greater. Please upgrade to a newer virtual NIC. (e.g., vmxnet3 or e1000e) The vmblock enables dragging or copying files between host and guest in a Fusion or Workstation virtual environment. Do you wish to enable this feature? [no] yes INPUT: [yes] NOTICE: It appears your system does not have the required fuse packages installed. The VMware blocking filesystem requires the fuse packages and its libraries to function properly. Please install the fuse or fuse-utils package using your systems package management utility and re-run this script in order to enable the VMware blocking filesystem. VMware automatic kernel modules enables automatic building and installation of VMware kernel modules at boot that are not already present. This feature can be enabled/disabled by re-running vmware-config-tools.pl. Would you like to enable VMware automatic kernel modules? [yes] INPUT: [yes] default Do you want to enable Guest Authentication (vgauth)? Enabling vgauth is needed if you want to enable Common Agent (caf). [yes] INPUT: [yes] default Do you want to enable Common Agent (caf)? [no] INPUT: [no] default No X install found. Skipping rebuilding initrd boot image for kernel as no drivers to be included in boot image were installed by this installer. Generating the key and certificate files. Successfully generated the key and certificate files. manageSELinux install: The 'semanage' utility was not found. There was an error configuring the SELinux security context for VMware Tools. Please make certain that SELinux is configured correctly. The configuration of VMware Tools 10.3.21 build-14772444 for Linux for this running kernel completed successfully. You must restart your X session before any mouse or graphics changes take effect. To enable advanced X features (e.g., guest resolution fit, drag and drop, and file and text copy/paste), you will need to do one (or more) of the following: 1. Manually start /usr/bin/vmware-user 2. Log out and log back into your desktop session 3. Restart your X session. Enjoy, --the VMware team [root@py vmware-tools-distrib]#
[root@cn-py-dl-c8 ~]# wget https://www.virtualbox.org/download/oracle_vbox.asc
[root@cn-py-dl-c8 ~]# rpm --import oracle_vbox.asc
[root@cn-py-dl-c8 ~]# wget https://download.virtualbox.org/virtualbox/6.1.30/VirtualBox-6.1-6.1.30_148432_el8-1.x86_64.rpm
[root@cn-py-dl-c8 ~]# rpm -ivh VirtualBox-6.1-6.1.30_148432_el8-1.x86_64.rpm
error: Failed dependencies:
        libGL.so.1()(64bit) is needed by VirtualBox-6.1-6.1.30_148432_el8-1.x86_64
        libQt5Core.so.5()(64bit) is needed by VirtualBox-6.1-6.1.30_148432_el8-1.x86_64
        libQt5Core.so.5(Qt_5)(64bit) is needed by VirtualBox-6.1-6.1.30_148432_el8-1.x86_64
        libQt5Core.so.5(Qt_5.11)(64bit) is needed by VirtualBox-6.1-6.1.30_148432_el8-1.x86_64
        libQt5Gui.so.5()(64bit) is needed by VirtualBox-6.1-6.1.30_148432_el8-1.x86_64
        libQt5Gui.so.5(Qt_5)(64bit) is needed by VirtualBox-6.1-6.1.30_148432_el8-1.x86_64
        libQt5OpenGL.so.5()(64bit) is needed by VirtualBox-6.1-6.1.30_148432_el8-1.x86_64
        libQt5OpenGL.so.5(Qt_5)(64bit) is needed by VirtualBox-6.1-6.1.30_148432_el8-1.x86_64
        libQt5PrintSupport.so.5()(64bit) is needed by VirtualBox-6.1-6.1.30_148432_el8-1.x86_64
        libQt5PrintSupport.so.5(Qt_5)(64bit) is needed by VirtualBox-6.1-6.1.30_148432_el8-1.x86_64
        libQt5Widgets.so.5()(64bit) is needed by VirtualBox-6.1-6.1.30_148432_el8-1.x86_64
        libQt5Widgets.so.5(Qt_5)(64bit) is needed by VirtualBox-6.1-6.1.30_148432_el8-1.x86_64
        libQt5X11Extras.so.5()(64bit) is needed by VirtualBox-6.1-6.1.30_148432_el8-1.x86_64
        libQt5X11Extras.so.5(Qt_5)(64bit) is needed by VirtualBox-6.1-6.1.30_148432_el8-1.x86_64
        libSDL-1.2.so.0()(64bit) is needed by VirtualBox-6.1-6.1.30_148432_el8-1.x86_64
        libXcursor.so.1()(64bit) is needed by VirtualBox-6.1-6.1.30_148432_el8-1.x86_64
        libXt.so.6()(64bit) is needed by VirtualBox-6.1-6.1.30_148432_el8-1.x86_64
        libasound.so.2()(64bit) is needed by VirtualBox-6.1-6.1.30_148432_el8-1.x86_64
        libopus.so.0()(64bit) is needed by VirtualBox-6.1-6.1.30_148432_el8-1.x86_64
        libvpx.so.5()(64bit) is needed by VirtualBox-6.1-6.1.30_148432_el8-1.x86_64