然后原来的一元机就换系统了……
0x00.修改主机名 如果在创建实例时高级设置 里指定了主机名 ,则会自动配置
1
2
3
4
5
6
7
8
[root@txy ~] 127.0.0.1 txy txy 127.0.0.1 localhost.localdomain localhost 127.0.0.1 localhost4.localdomain4 localhost4 ::1 txy txy ::1 localhost.localdomain localhost ::1 localhost6.localdomain6 localhost6
否则,手动更改
1
2
3
4
5
6
7
8
9
10
11
12
[root@txy ~] [root@txy ~] txy.yuangezhizao.cn [root@txy ~] 127.0.0.1 txy.yuangezhizao.cn txy.yuangezhizao.cn 127.0.0.1 localhost.localdomain localhost 127.0.0.1 localhost4.localdomain4 localhost4 ::1 txy.yuangezhizao.cn txy.yuangezhizao.cn ::1 localhost.localdomain localhost ::1 localhost6.localdomain6 localhost6 [root@txy ~]
0x01.修改SSH端口 改成非22端口防止爆破
1
2
3
4
5
6
7
8
9
[root@txy ~]# vim /etc/ssh/sshd_config …… # If you want to change the port on a SELinux system, you have to tell # SELinux about this change. # semanage port -a -t ssh_port_t -p tcp #PORTNUMBER # #Port 22 …… [root@txy ~]# systemctl restart sshd
注意一定要新开个shell测试新端口是否生效,生效则可关闭旧shell,否则需重新配置
0x02.软件 1 2 yum update -y yum install htop screen git axel iftop -y
nfs-utils:暂时10G免费
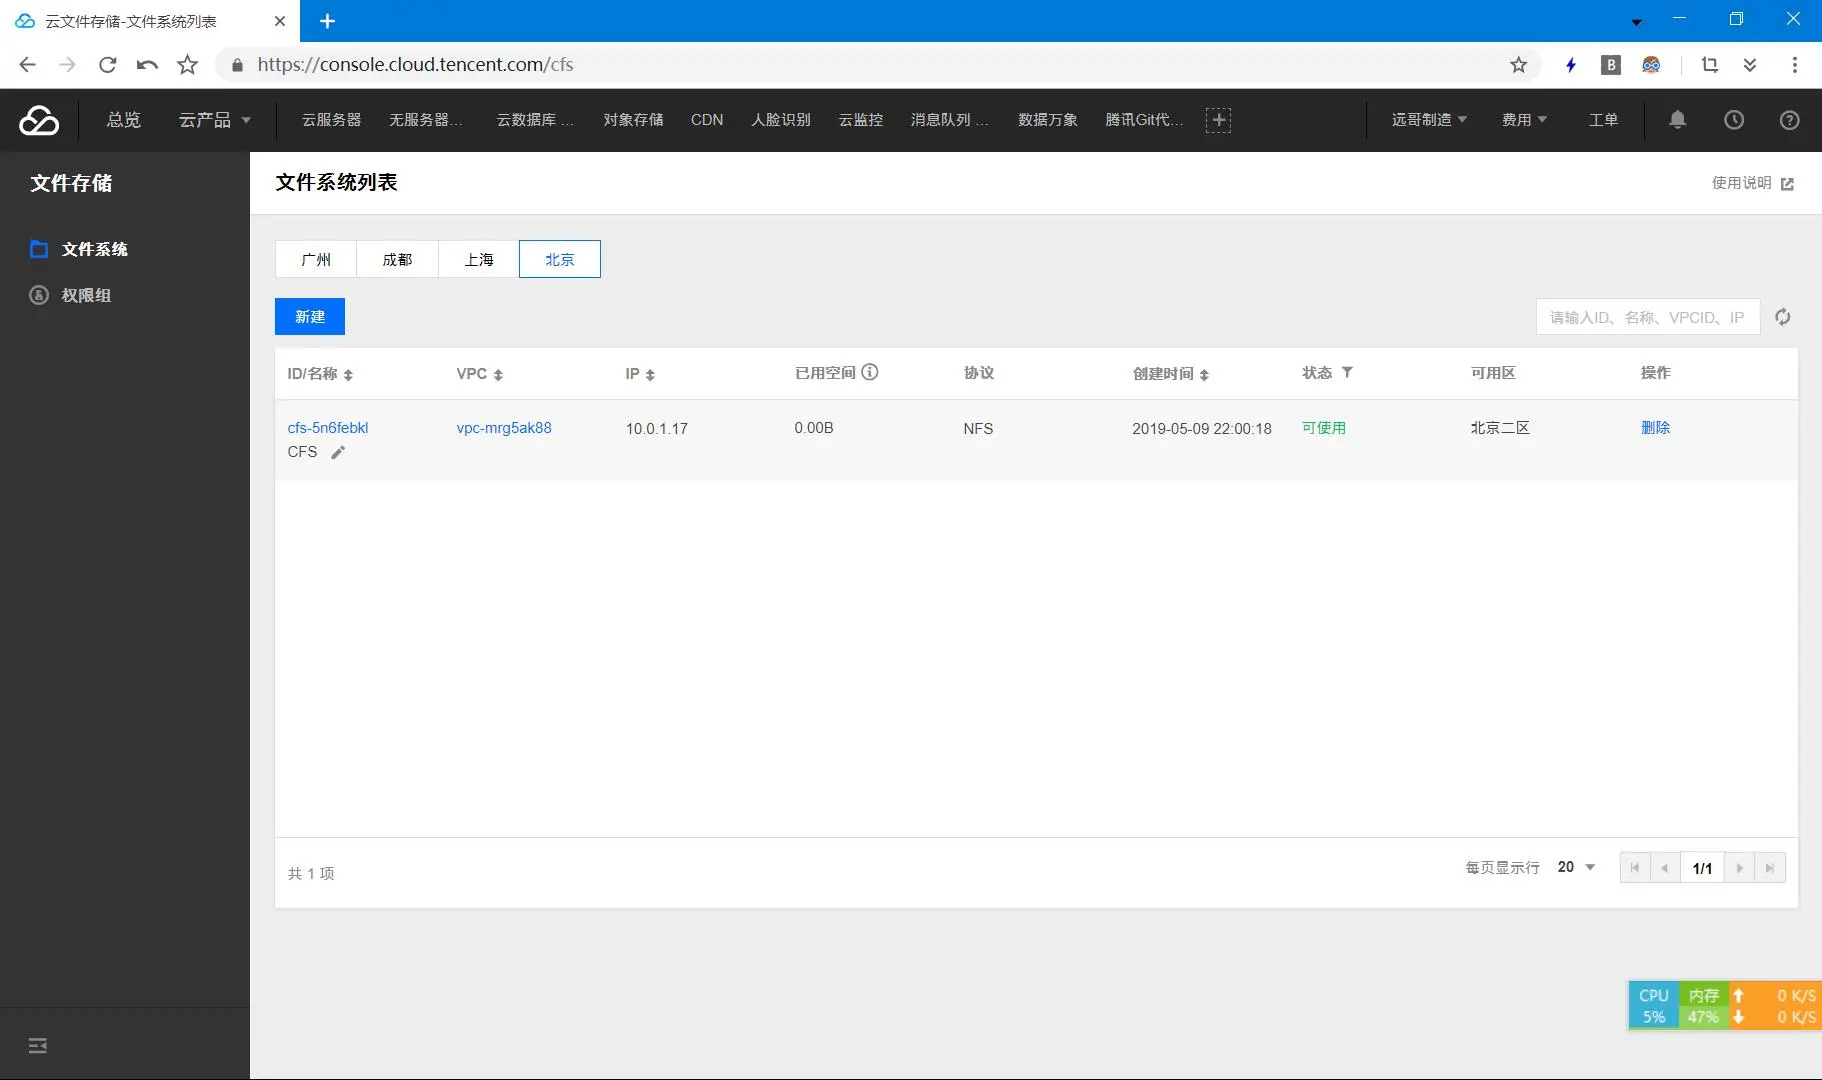
腾讯云文件系统
COSFS:https://github.com/tencentyun/cosfs
直接在本地是相当爽了,可惜 Win 享受不到
0x03.挂载第三方存储 腾讯云文件存储即CFS 腾讯云对象存储即COS白嫖的一年资源包
最终效果可以说是相当爽了
1. 查看现有位置 现有路径
全新:
1 2 [root@cn-py-dl-r8 ~]# whereis python python: /usr/bin/python3.6 /usr/bin/python3.6m /usr/lib/python3.6 /usr/lib64/python3.6 /usr/include/python3.6m /usr/share/man/man1/python.1.gz
2. 安装编译工具 yum groupinstall 'Development Tools' -y
1 2 dnf install gcc make gcc-c++ zlib-devel bzip2-devel openssl-devel ncurses-devel sqlite-devel readline-devel tk-devel libffi-devel gdbm-devel xz-devel -y dnf install libnsl2-devel bluez-libs-devel tix-devel -y
或参照Install dependencies 解决依赖dnf install dnf-plugins-core && dnf builddep python3
这里面有一个包很关键libffi-devel,因为只有3.7才会用到这个包,如果不安装这个包的话,在make阶段会出现如下的报错:# ModuleNotFoundError: No module named '_ctypes'
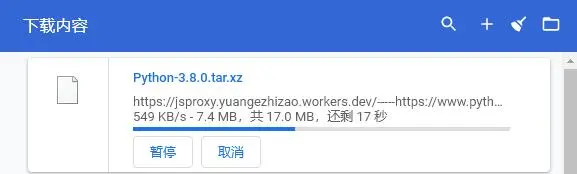
3. 下载源码包 wget https://www.python.org/ftp/python/3.11.1/Python-3.11.1.tar.xz
下载卡爆,jsproxy 启动!
或
下载卡爆,proxy 中转爽到!
1 2 3 4 CloudFlare(推荐): wget https://proxy-cf.yuangezhizao.cn/dl/Python-3.11.1.tar.xz Skysilk: wget http://proxy.yuangezhizao.cn/dl/Python-3.11.1.tar.xz
4. 解压 1 2 tar xvJf Python-3.11.1.tar.xz cd Python-3.11.1
5. 编译 参照:https://docs.python.org/zh-cn/3/using/configure.html#configure-options
注:添加--enable-optimizations(以配置文件主导的优化PGO)和--with-lto(链接时间优化LTO)之后的编译速度会变慢,但理论上编译产物的运行效率?会提高不添加--enable-shared(生成动态链接库)编译会报错:command 'gcc' failed with exit status 1rm -rf /usr/local/python3./configure --prefix=/usr/local/python3 --enable-shared --enable-optimizations --with-lto./configure --prefix=/usr/local/python3 --enable-optimizations --with-lto=fullmake && make install--with-lto编译标志位时,编译时需保证峰值空闲有3G内存,否则在ar的时候会因内存不足而终止
1 2 3 4 5 6 7 8 9 10 11 12 13 14 15 16 17 18 gcc -pthread -c -Wno-unused-result -Wsign-compare -DNDEBUG -g -fwrapv -O3 -Wall -fno-semantic-interposition -flto -fuse-linker-plugin -ffat-lto-objects -flto-partition=none -g -std=c99 -Wextra -Wno-unused-result -Wno-unused-parameter -Wno-missing-field-initializers -Werror=implicit-function-declaration -fvisibility=hidden -fprofile-generate -I./Include/internal -I. -I./Include -DPy_BUILD_CORE -o Python/frozen.o Python/frozen.c rm -f libpython3.10.aar rcs libpython3.10.a Modules/getbuildinfo.o Parser/token.o Parser/pegen.o Parser/parser.o Parser/string_parser.o Parser/peg_api.o Parser/myreadline.o Parser/tokenizer.o Objects/abstract.o Objects/accu.o Objects/boolobject.o Objects/bytes_methods.o Objects/bytearrayobject.o Objects/bytesobject.o Objects/call.o Objects/capsule.o Objects/cellobject.o Objects/classobject.o Objects/codeobject.o Objects/complexobject.o Objects/descrobject.o Objects/enumobject.o Objects/exceptions.o Objects/genericaliasobject.o Objects/genobject.o Objects/fileobject.o Objects/floatobject.o Objects/frameobject.o Objects/funcobject.o Objects/interpreteridobject.o Objects/iterobject.o Objects/listobject.o Objects/longobject.o Objects/dictobject.o Objects/odictobject.o Objects/memoryobject.o Objects/methodobject.o Objects/moduleobject.o Objects/namespaceobject.o Objects/object.o Objects/obmalloc.o Objects/picklebufobject.o Objects/rangeobject.o Objects/setobject.o Objects/sliceobject.o Objects/structseq.o Objects/tupleobject.o Objects/typeobject.o Objects/unicodeobject.o Objects/unicodectype.o Objects/unionobject.o Objects/weakrefobject.o Python/_warnings.o Python/Python-ast.o Python/asdl.o Python/ast.o Python/ast_opt.o Python/ast_unparse.o Python/bltinmodule.o Python/ceval.o Python/codecs.o Python/compile.o Python/context.o Python/dynamic_annotations.o Python/errors.o Python/frozenmain.o Python/future.o Python/getargs.o Python/getcompiler.o Python/getcopyright.o Python/getplatform.o Python/getversion.o Python/hamt.o Python/hashtable.o Python/import.o Python/importdl.o Python/initconfig.o Python/marshal.o Python/modsupport.o Python/mysnprintf.o Python/mystrtoul.o Python/pathconfig.o Python/preconfig.o Python/pyarena.o Python/pyctype.o Python/pyfpe.o Python/pyhash.o Python/pylifecycle.o Python/pymath.o Python/pystate.o Python/pythonrun.o Python/pytime.o Python/bootstrap_hash.o Python/structmember.o Python/symtable.o Python/sysmodule.o Python/thread.o Python/traceback.o Python/getopt.o Python/pystrcmp.o Python/pystrtod.o Python/pystrhex.o Python/dtoa.o Python/formatter_unicode.o Python/fileutils.o Python/suggestions.o Python/dynload_shlib.o Modules/config.o Modules/getpath.o Modules/main.o Modules/gcmodule.o Modules/posixmodule.o Modules/errnomodule.o Modules/pwdmodule.o Modules/_sre.o Modules/_codecsmodule.o Modules/_weakref.o Modules/_functoolsmodule.o Modules/_operator.o Modules/_collectionsmodule.o Modules/_abc.o Modules/itertoolsmodule.o Modules/atexitmodule.o Modules/signalmodule.o Modules/_stat.o Modules/timemodule.o Modules/_threadmodule.o Modules/_localemodule.o Modules/_iomodule.o Modules/iobase.o Modules/fileio.o Modules/bytesio.o Modules/bufferedio.o Modules/textio.o Modules/stringio.o Modules/faulthandler.o Modules/_tracemalloc.o Modules/symtablemodule.o Modules/xxsubtype.o Python/frozen.o gcc -pthread -fno-semantic-interposition -flto -fuse-linker-plugin -ffat-lto-objects -flto-partition=none -g -fprofile-generate -Xlinker -export-dynamic -o python Programs/python.o libpython3.10.a -lcrypt -lpthread -ldl -lutil -lm -lm gcc: fatal error: Killed signal terminated program as compilation terminated. lto-wrapper: fatal error: gcc returned 1 exit status compilation terminated. /usr/bin/ld: error: lto-wrapper failed collect2: error: ld returned 1 exit status make[3]: *** [Makefile:601: python] Error 1 make[3]: Leaving directory '/root/Python-3.10.1' make[2]: *** [Makefile:531: build_all_generate_profile] Error 2 make[2]: Leaving directory '/root/Python-3.10.1' make[1]: *** [Makefile:507: profile-gen-stamp] Error 2 make[1]: Leaving directory '/root/Python-3.10.1' make: *** [Makefile:519: profile-run-stamp] Error 2 [root@cn-tx-bj7-c8 Python-3.10.1]
6. 修复 ①2020-9-7 23:33:59:CentOS 8自带版本已为8,直接编译,成功!2020-5-22 00:06:54:CentOS自带gcc版本是4,升级至版本8即可解决(而之前在ubuntu编译的时候是版本7,因此可以直接编译通过
1 2 3 4 5 6 7 8 9 10 11 12 13 14 15 16 [root@txy Python-3.8.3] Python 3.8.3 (default, May 31 2020, 21:31:58) [GCC 8.3.1 20190311 (Red Hat 8.3.1-3)] on linux Type "help" , "copyright" , "credits" or "license" for more information. >>> [1]+ Stopped python3 [root@txy ~] linux-vdso.so.1 => (0x00007ffdfe1d7000) libcrypt.so.1 => /lib64/libcrypt.so.1 (0x00007f58dfe8f000) libpthread.so.0 => /lib64/libpthread.so.0 (0x00007f58dfc73000) libdl.so.2 => /lib64/libdl.so.2 (0x00007f58dfa6f000) libutil.so.1 => /lib64/libutil.so.1 (0x00007f58df86c000) libm.so.6 => /lib64/libm.so.6 (0x00007f58df56a000) libc.so.6 => /lib64/libc.so.6 (0x00007f58df19c000) libfreebl3.so => /lib64/libfreebl3.so (0x00007f58def99000) /lib64/ld-linux-x86-64.so.2 (0x00007f58e00c6000)
②旧法(不推荐使用)添加--enable-shared编译之后会报找不到so的错误,此时可利用ldd工具查看详细
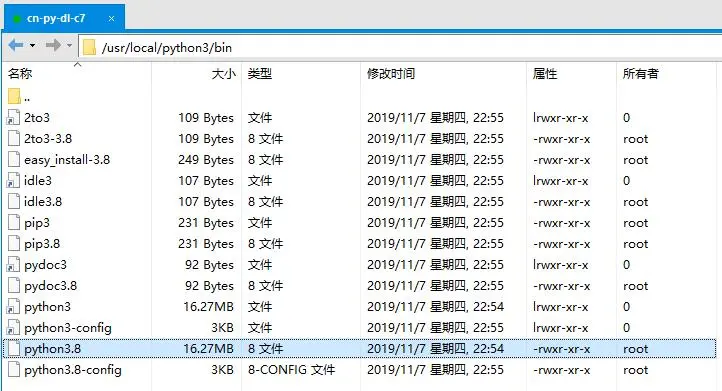
1 2 3 4 5 6 7 8 9 10 11 12 13 14 15 16 [root@txy ~] python3: error while loading shared libraries: libpython3.8.so.1.0: cannot open shared object file: No such file or directory [root@txy ~] [root@txy bin] 2to3 2to3-3.8 easy_install-3.8 idle3 idle3.8 pip3 pip3.8 pydoc3 pydoc3.8 python3 python3.8 python3.8-config python3-config [root@txy bin] linux-vdso.so.1 => (0x00007ffd24de9000) libpython3.8.so.1.0 => not found libcrypt.so.1 => /lib64/libcrypt.so.1 (0x00007f9e9dd3c000) libpthread.so.0 => /lib64/libpthread.so.0 (0x00007f9e9db20000) libdl.so.2 => /lib64/libdl.so.2 (0x00007f9e9d91c000) libutil.so.1 => /lib64/libutil.so.1 (0x00007f9e9d719000) libm.so.6 => /lib64/libm.so.6 (0x00007f9e9d417000) libc.so.6 => /lib64/libc.so.6 (0x00007f9e9d049000) libfreebl3.so => /lib64/libfreebl3.so (0x00007f9e9ce46000) /lib64/ld-linux-x86-64.so.2 (0x00007f9e9df73000)
需要手动将所缺so库libpython3.8.so.1.0移至库目录下,具体生效路径为:/usr/lib64/,这里测试/usr/lib/、/usr/local/lib/、/usr/local/lib64/均无效……
1 2 3 [root@txy ~] [root@txy ~] Python 3.8.3
7. 创建软链接(python3&pip3) 此法不会破坏自带py环境,因此无需修改任何yum文件注:更改yum配置vim /usr/bin/yumvim /usr/libexec/urlgrabber-ext-downvim /bin/yum-config-manager把#! /usr/bin/python修改为#! /usr/bin/python2
重新创建/usr/bin/python3和/usr/bin/pip3的软链接
1 2 3 4 5 6 7 8 9 10 11 12 13 14 15 16 17 18 19 20 21 22 23 24 25 26 27 28 29 30 31 32 33 34 35 36 37 38 39 40 41 42 43 [root@cn-tx-bj7-c8 Python-3.11.1] [root@cn-tx-bj7-c8 Python-3.11.1] [root@cn-tx-bj7-c8 Python-3.11.1] [root@cn-tx-bj7-c8 Python-3.11.1] [root@cn-tx-bj7-c8 Python-3.11.1] -rwxr-xr-x 1 root root 3555 Nov 9 2019 bno_plot.py lrwxrwxrwx 1 root root 54 Nov 9 15:50 cagent_tools -> /usr/local/qcloud/monitor/barad/client/cagent_tools.py lrwxrwxrwx 1 root root 7 Nov 24 2020 fail2ban-python -> python3 -rwxr-xr-x 1 root root 245864 Nov 12 2021 objcopy lrwxrwxrwx 1 root root 30 Dec 24 17:09 pip3 -> /usr/local/python3/bin/pip3.11 -rwxr-xr-x 1 root root 12096 Aug 31 2021 pmpython lrwxrwxrwx 1 root root 25 Dec 10 2019 pydoc-3 -> /etc/alternatives/pydoc-3 lrwxrwxrwx 1 root root 24 Dec 10 2019 pydoc3 -> /etc/alternatives/pydoc3 -rwxr-xr-x 1 root root 89 Sep 10 2021 pydoc3.6 lrwxrwxrwx 1 root root 30 Dec 24 17:07 python3 -> /usr/local/python3/bin/python3 lrwxrwxrwx 1 root root 31 Aug 25 2021 python3.6 -> /usr/libexec/platform-python3.6 lrwxrwxrwx 1 root root 32 Aug 25 2021 python3.6m -> /usr/libexec/platform-python3.6m lrwxrwxrwx 1 root root 25 Dec 10 2019 python3.original -> /etc/alternatives/python3 lrwxrwxrwx 1 root root 26 Dec 10 2019 pyvenv-3 -> /etc/alternatives/pyvenv-3 -rwxr-xr-x 1 root root 446 Sep 10 2021 pyvenv-3.6 -rwxr-xr-x 1 root root 21440 Apr 24 2020 sg_copy_results -rwxr-xr-x 1 root root 41632 Apr 24 2020 sg_xcopy -rwxr-xr-x 1 root root 10694 Jul 13 2021 ssh-copy-id lrwxrwxrwx 1 root root 24 Jul 13 2020 unversioned-python -> /etc/alternatives/python [root@cn-tx-bj7-c8 Python-3.11.1] -rwxr-xr-x. 1 root root 3143 May 11 2019 lesspipe.sh lrwxrwxrwx 1 root root 15 Dec 10 2019 pip -> /usr/bin/pip3.6 lrwxrwxrwx 1 root root 23 Dec 10 2019 pip-3 -> /etc/alternatives/pip-3 lrwxrwxrwx 1 root root 30 Dec 24 17:09 pip3 -> /usr/local/python3/bin/pip3.11 lrwxrwxrwx 1 root root 8 Jun 21 2021 pip-3.6 -> ./pip3.6 -rwxr-xr-x 1 root root 209 Jun 21 2021 pip3.6 lrwxrwxrwx 1 root root 22 Dec 10 2019 pip3.original -> /etc/alternatives/pip3 [root@cn-tx-bj7-c8 Python-3.11.1] -bash: python: command not found [root@cn-tx-bj7-c8 Python-3.11.1] Python 3.11.1 [root@cn-tx-bj7-c8 Python-3.11.1] pip 22.3.1 from /usr/local/python3/lib/python3.11/site-packages/pip (python 3.11) [root@cn-tx-bj7-c8 Python-3.11.1] Python 3.11.1 (main, Dec 24 2022, 16:46:54) [GCC 8.5.0 20210514 (Red Hat 8.5.0-4)] on linux Type "help" , "copyright" , "credits" or "license" for more information. >>> [1]+ Stopped python3
这样就可以通过python/python2命令使用Python,python3来使用Python 3好了,CentOS 8这下2终于彻底没有了
8. 升级pip3 你云环境下会自动配置镜像源pip3 install -i https://pypi.tuna.tsinghua.edu.cn/simple pip -Upip3 config set global.index-url https://pypi.tuna.tsinghua.edu.cn/simplepython3 -m pip install --upgrade pippip3的另一种方法
1 2 curl https://bootstrap.pypa.io/get-pip.py -o get-pip.py python3 get-pip.py
9. 加入环境变量 1 2 3 4 5 6 7 8 9 10 11 12 13 [root@txy ~] if [ -f ~/.bashrc ]; then . ~/.bashrc fi PATH=$PATH :$HOME /bin:/usr/local/python3/bin export PATH
官网
V0.2 公测版
一键安装yum install -y wget && wget -O install.sh https://download.xp.cn/install.sh && sh install.sh
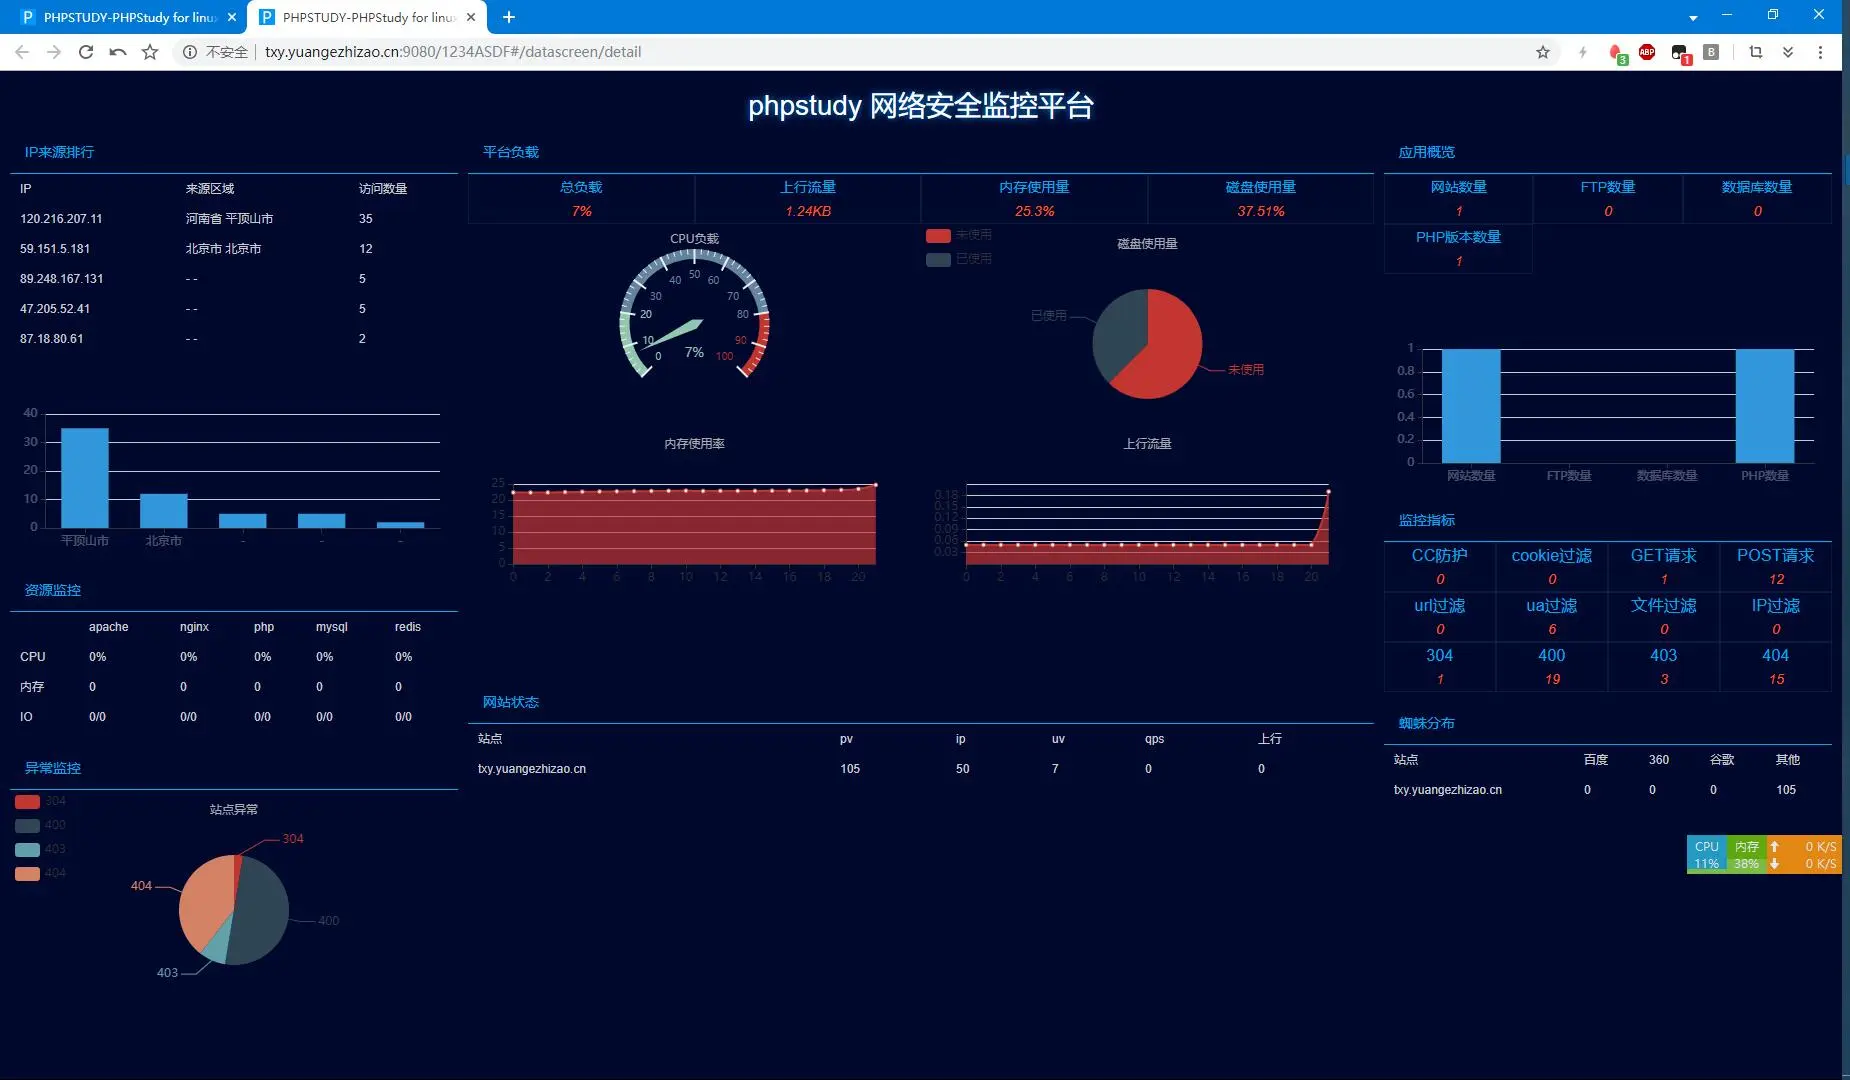
还不错的面板
吊炸天的监控
准备mkdir nginx_build && cd nginx_build1.17.3版本Nginx源码wget http://nginx.org/download/nginx-1.17.3.tar.gztar -xvf nginx-1.17.3.tar.gz0.1.18版本nginx-module-vts源码wget https://github.com/vozlt/nginx-module-vts/archive/v0.1.18.tar.gztar -xvf v0.1.18.tar.gzyum -y install gcc gcc-c++ pcre pcre-devel zlib zlib-devel openssl openssl-develcd nginx-1.17.3/./configure --add-module=/root/nginx_build/nginx-module-vts-0.1.18make && make installvim /usr/local/nginx/conf/nginx.conf
1 2 3 4 5 6 7 8 9 10 11 12 13 14 15 http { vhost_traffic_status_zone; ... server { ... location /status { vhost_traffic_status_display; vhost_traffic_status_display_format html; } } }
运行
1 2 3 4 5 [root@txy ~] [root@txy ~] root 7895 0.0 0.0 21780 644 ? Ss 21:42 0:00 nginx: master process /usr/local/nginx/sbin/nginx nobody 7896 0.0 0.1 24236 1416 ? S 21:42 0:00 nginx: worker process root 7915 0.0 0.0 112708 976 pts/0 S+ 21:42 0:00 grep --color=auto nginx
自启/usr/local/nginx/sbin/nginx命令加入/etc/rc.d/rc.local文件并赋予权限chmod +x /etc/rc.d/rc.local
0x07.测试延迟 也就只能凑合看下,不过拿来对比应该是可以的cn-py-dl-c7
1 2 3 4 5 6 7 8 9 10 11 [root@py ~] PING jrmkt.jd.com.gslb.qianxun.com (61.48.89.125) 56(84) bytes of data. 64 bytes from 61.48.89.125 (61.48.89.125): icmp_seq=1 ttl=38 time=27.8 ms 64 bytes from 61.48.89.125 (61.48.89.125): icmp_seq=2 ttl=38 time=34.1 ms 64 bytes from 61.48.89.125 (61.48.89.125): icmp_seq=3 ttl=38 time=27.7 ms 64 bytes from 61.48.89.125 (61.48.89.125): icmp_seq=4 ttl=38 time=27.2 ms 64 bytes from 61.48.89.125 (61.48.89.125): icmp_seq=5 ttl=38 time=27.3 ms ^C --- jrmkt.jd.com.gslb.qianxun.com ping statistics --- 5 packets transmitted, 5 received, 0% packet loss, time 6565ms rtt min/avg/max/mdev = 27.242/28.895/34.189/2.664 ms
②cn-tx-bj1-w2d
1 2 3 4 5 6 7 8 9 10 11 12 C:\LAB>ping jrmkt.jd.com 正在 Ping jrmkt.jd.com.gslb.qianxun.com [49.7.26.66] 具有 32 字节的数据: 来自 49.7.26.66 的回复: 字节=32 时间=4ms TTL=250 来自 49.7.26.66 的回复: 字节=32 时间=4ms TTL=250 来自 49.7.26.66 的回复: 字节=32 时间=4ms TTL=250 来自 49.7.26.66 的回复: 字节=32 时间=4ms TTL=250 49.7.26.66 的 Ping 统计信息: 数据包: 已发送 = 4,已接收 = 4,丢失 = 0 (0% 丢失), 往返行程的估计时间(以毫秒为单位): 最短 = 4ms,最长 = 4ms,平均 = 4ms
③cn-tx-bj3-c8
1 2 3 4 5 6 7 8 9 10 11 [root@txy ~] PING jrmkt.jd.com.gslb.qianxun.com (61.48.89.125) 56(84) bytes of data. 64 bytes from 61.48.89.125 (61.48.89.125): icmp_seq=1 ttl=251 time=7.03 ms 64 bytes from 61.48.89.125 (61.48.89.125): icmp_seq=2 ttl=251 time=7.00 ms 64 bytes from 61.48.89.125 (61.48.89.125): icmp_seq=3 ttl=251 time=7.02 ms 64 bytes from 61.48.89.125 (61.48.89.125): icmp_seq=4 ttl=251 time=7.01 ms 64 bytes from 61.48.89.125 (61.48.89.125): icmp_seq=5 ttl=251 time=7.01 ms ^C --- jrmkt.jd.com.gslb.qianxun.com ping statistics --- 5 packets transmitted, 5 received, 0% packet loss, time 1005ms rtt min/avg/max/mdev = 7.004/7.012/7.029/0.092 ms
由此可见家里肯定是最慢的了,另外北京一区 比北京三区 快1ms
1 2 3 4 5 6 7 8 9 10 11 12 13 14 15 16 17 18 19 20 21 22 23 24 25 26 27 28 29 30 31 32 33 34 35 36 37 38 39 40 41 42 43 44 45 46 47 48 49 50 51 52 [root@cn-tx-bj1-r8 ~] [root@cn-tx-bj1-r8 ~] [root@cn-tx-bj1-r8 ~] Python 3.8.12 (heads/v2.3.4.1_release:4a6b4d3504, Jun 3 2022, 15:46:12) [Pyston 2.3.4, GCC 9.4.0] on linux Type "help" , "copyright" , "credits" or "license" for more information. >>> [1]+ Stopped /root/pyston_2.3.4/bin/pyston3 [root@cn-tx-bj1-r8 ~] [root@cn-tx-bj1-r8 ~] (pyston-venv) [root@cn-tx-bj1-r8 ~] pip 21.1.1 from /root/pyston-venv/lib/python3.8-pyston2.3/site-packages/pip (python 3.8) (pyston-venv) [root@txy sku] Traceback (most recent call last): File "JD_Sku_Demo.py" , line 3, in <module> from JD_Sku.sku import SKu ImportError: cannot import name 'SKu' from 'JD_Sku.sku' (/root/jd/sku/JD_Sku/sku.py) (pyston-venv) [root@txy sku] . ├── cookies.txt ├── examples │ ├── address.json │ └── stock.json ├── JD_Sku │ ├── account.py │ ├── __init__.py │ ├── __pycache__ │ │ ├── account.cpython-39.pyc │ │ ├── account.pyston-22.pyc │ │ ├── __init__.cpython-39.pyc │ │ ├── __init__.pyston-22.pyc │ │ ├── sku.cpython-39.pyc │ │ ├── sku.pyston-22.pyc │ │ ├── utf8logger.cpython-39.pyc │ │ └── utf8logger.pyston-22.pyc │ ├── sku.py │ └── utf8logger.py └── JD_Sku_Demo.py 3 directories, 16 files (pyston-venv) [root@txy JD_Sku] (pyston-venv) [root@txy JD_Sku] (pyston-venv) [root@txy sku] [2021-06-05 20:37:18,286][_get_nick_name:47]【INFO】远哥制造 cookies is OK [2021-06-05 20:37:18,290][normal_mode:27]【INFO】= = = 就 绪 = = = [2021-06-05 20:37:18,416][normal_mode:43]【INFO】4953.583314697265 ^CTraceback (most recent call last): File "JD_Sku_Demo.py" , line 10, in <module> a.normal_mode('2021-06-05 22:00:00' ) File "/root/jd/sku/JD_Sku/sku.py" , line 44, in normal_mode time.sleep(cha) KeyboardInterrupt
0x10.引用 python –enable-shared CentOS 7 升级gcc/g++编译器 3.7.0 build error with –enable-optimizations 开启Link Time Optimization(LTO)后到底有什么优化? CentOS 源码编译安装 Python3 在 CentOS 上编译安装 Python 3
 腾讯云文件系统
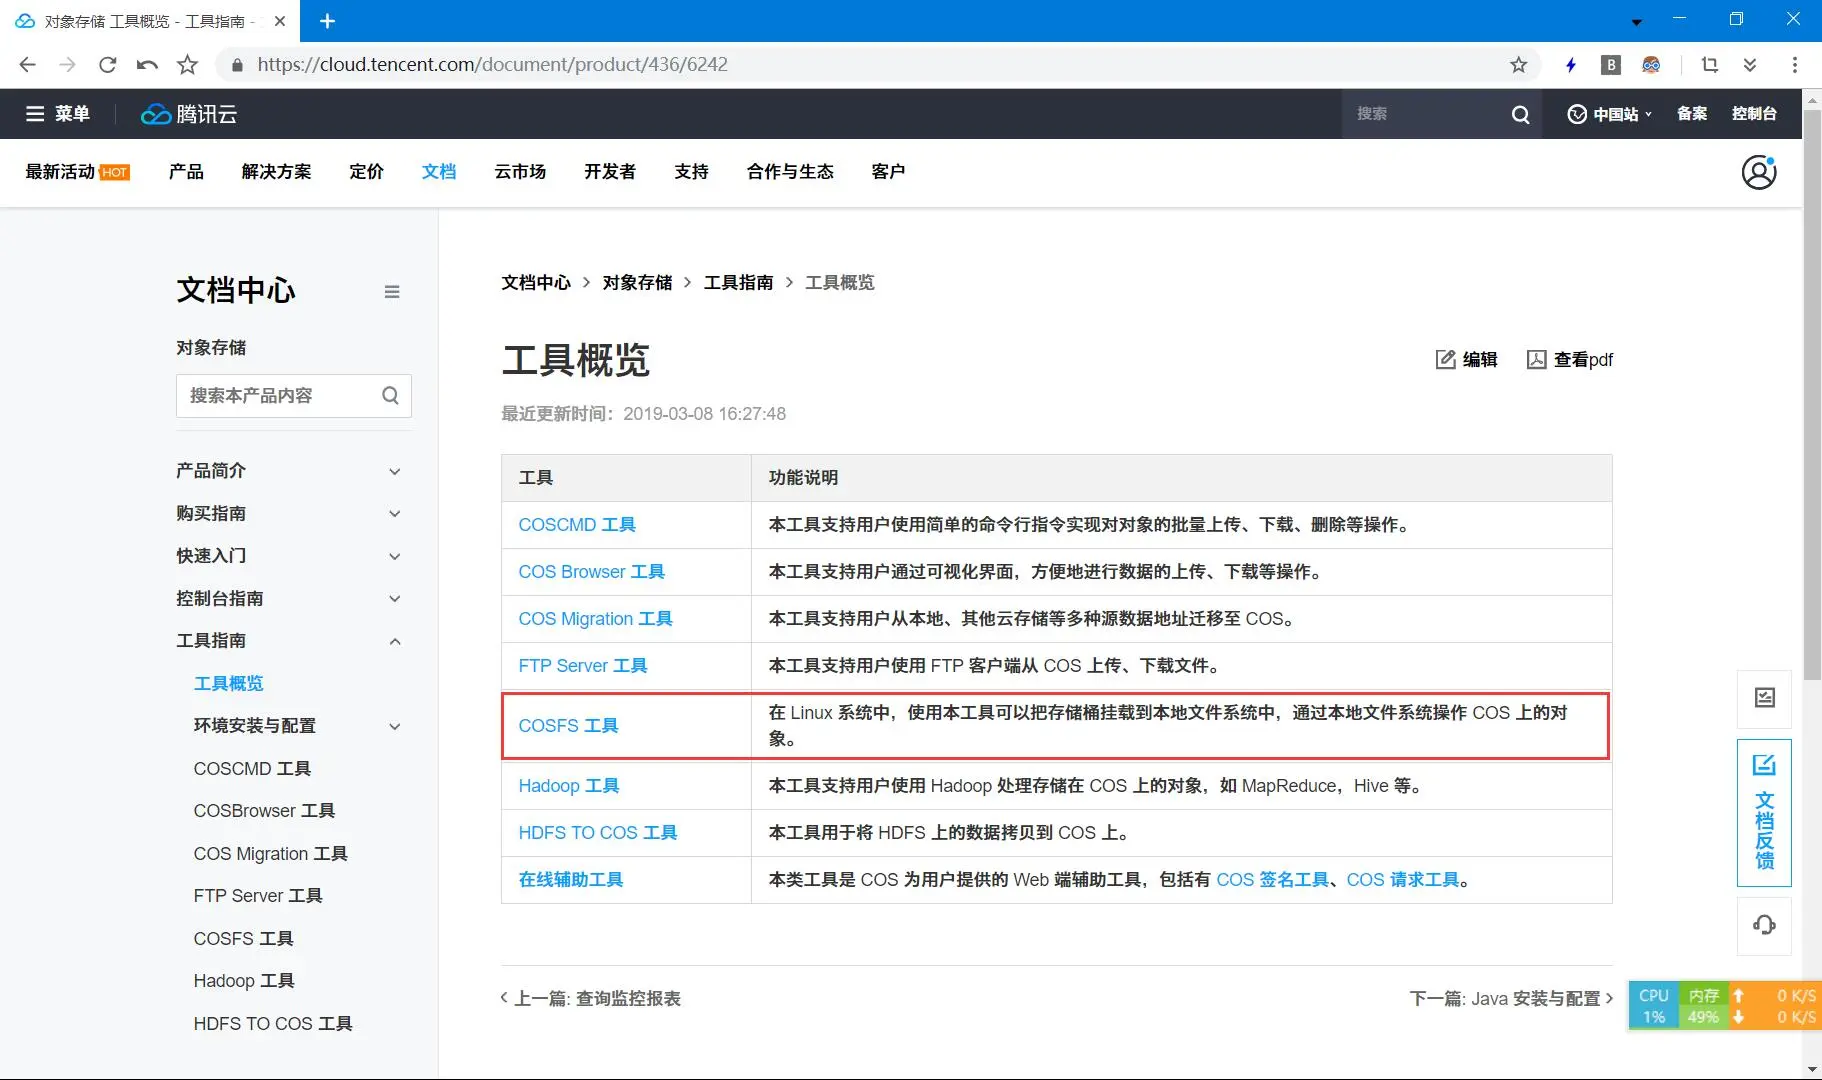 直接在本地是相当爽了,可惜 Win 享受不到
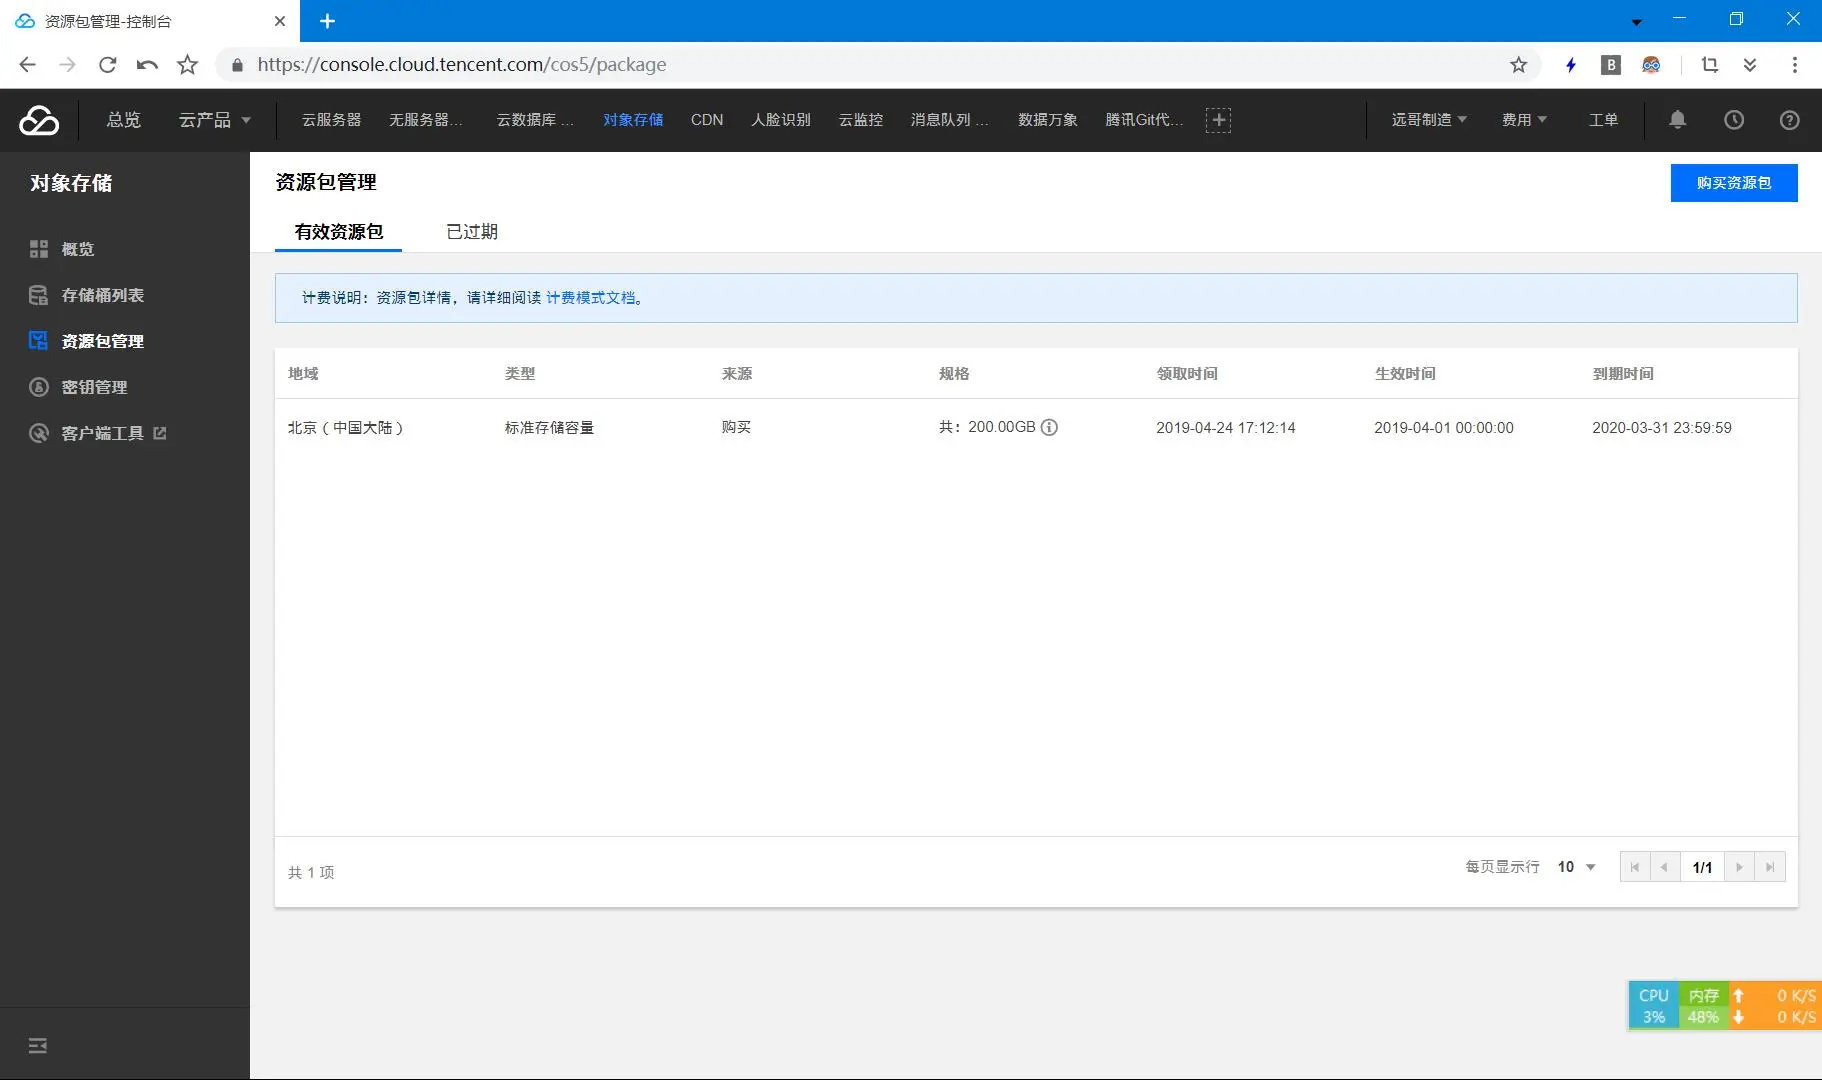 白嫖的一年资源包
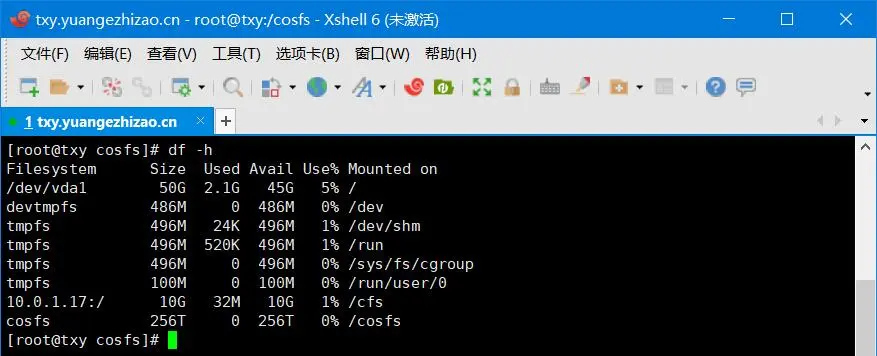 最终效果可以说是相当爽了